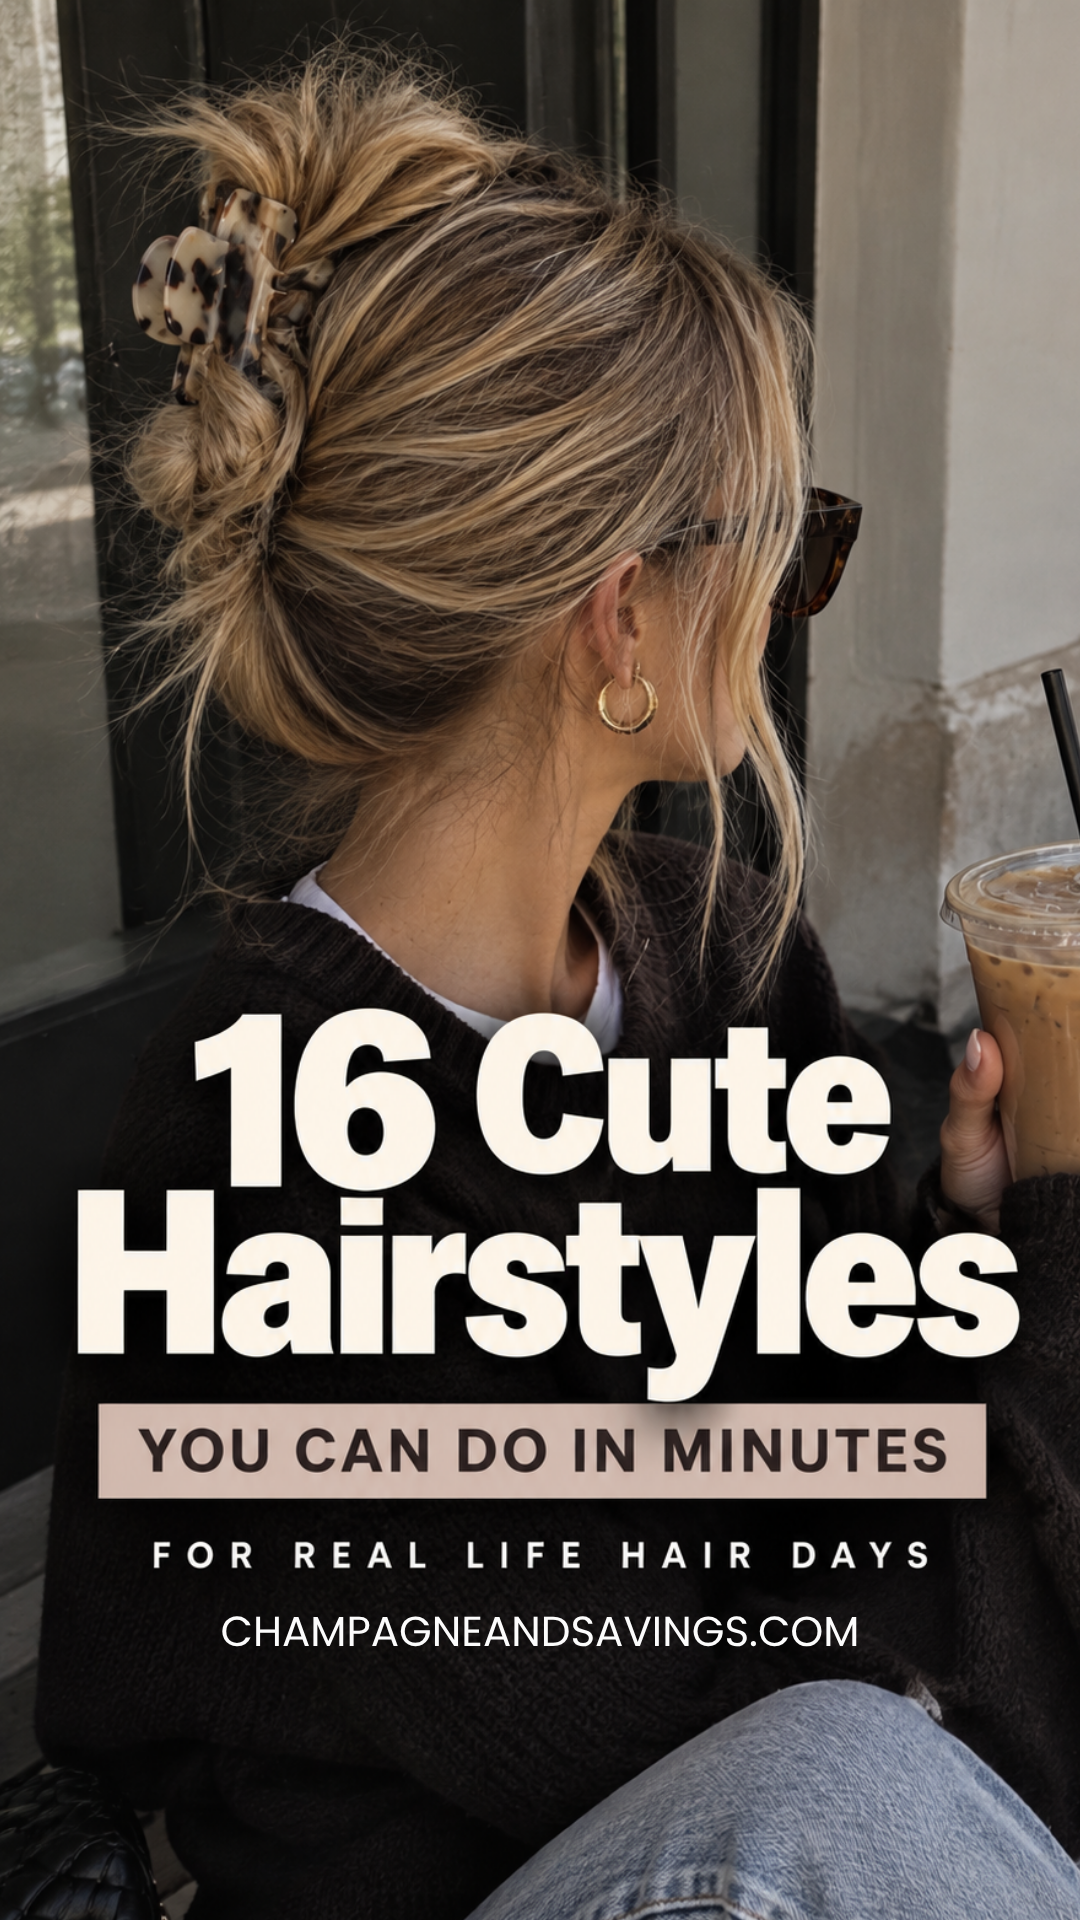
16 Cute Easy Hairstyles You Can Actually Do Yourself
I love an easy but cute hairstyle that requires basically no hair skills because, let’s face it- I have none!
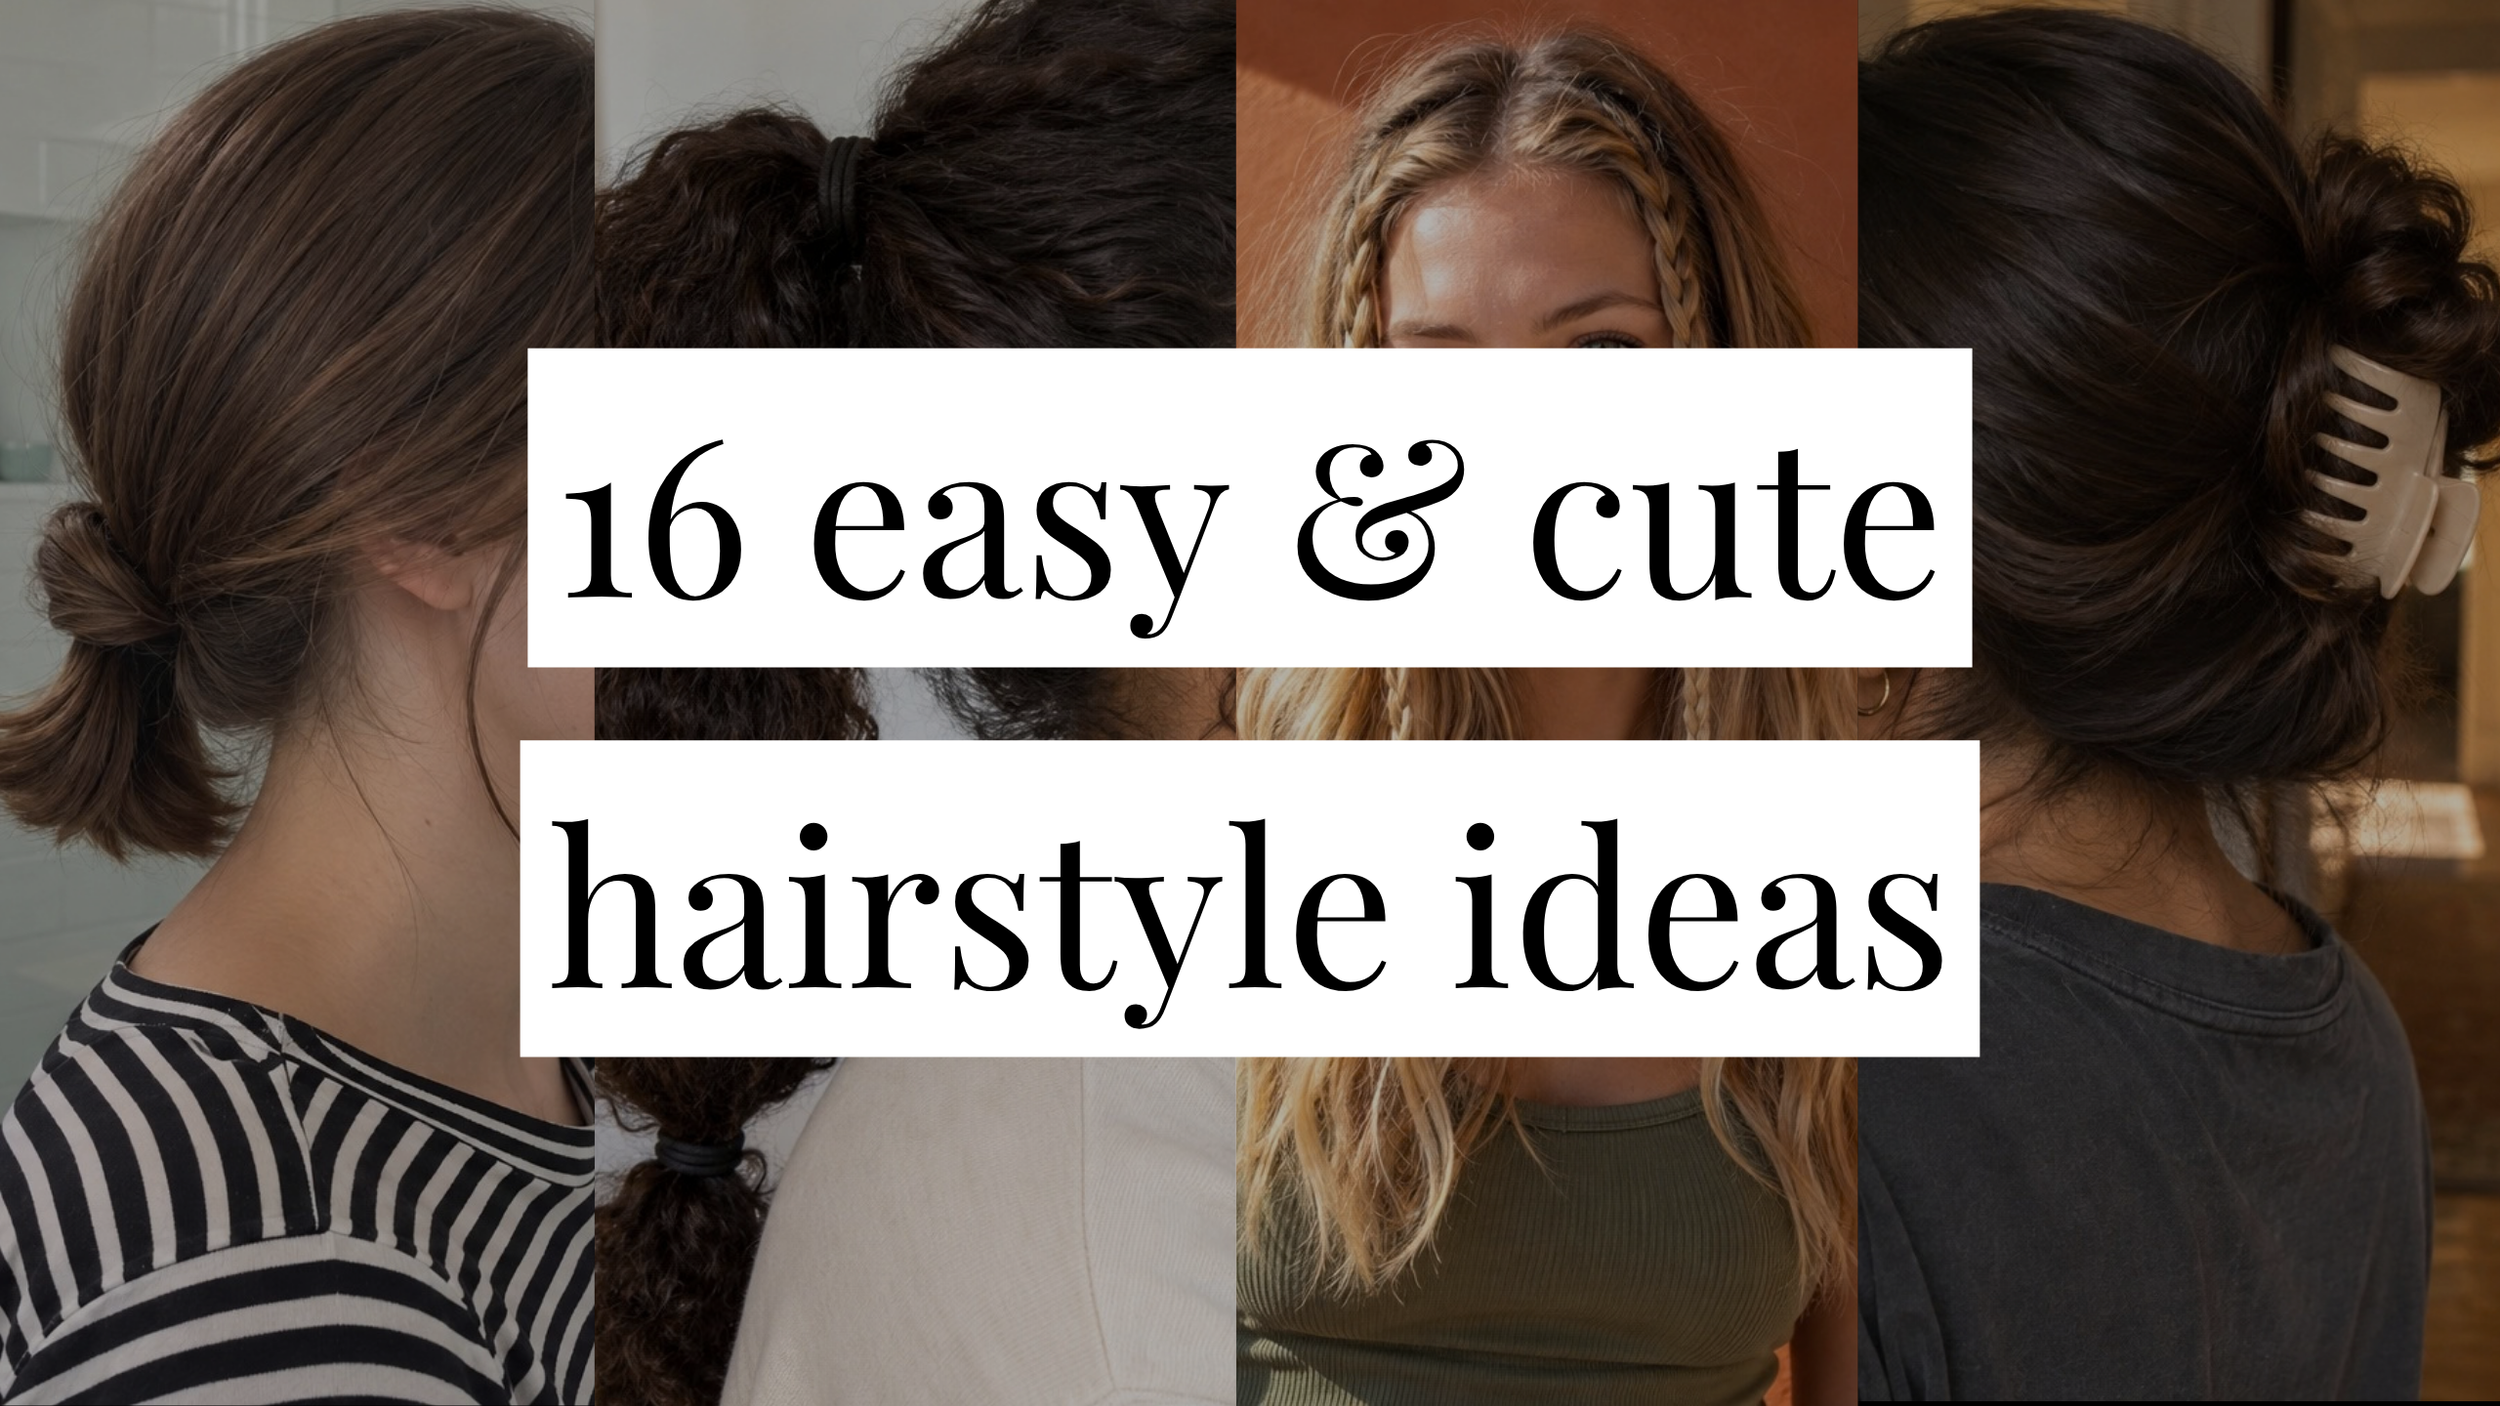
So if you’re like me, then these are cute easy hairstyles with steps you can actually follow: claw clips, simple buns, easy but elevated ponytails, and a few ways to wear your hair down without doing the exact same thing every day. No French braiding or full blowout required.
RELATED POSTS:
The Biggest Hair Trends for 2026 (That Actually Feel Wearable)
17 Hair Hacks for Thicker, More Voluminous Hair
There are easy hairstyles for medium hair and long hair here, plus a few that work on shorter cuts. Pick one that suits your length and texture, grab the accessories listed, and give it a practice run before you're already late.
16 Cute Easy Hairstyles, Step by Step
From claw clip hairstyles to easy updos, these are the looks I’d keep in rotation.
1. Claw Clip French Twist
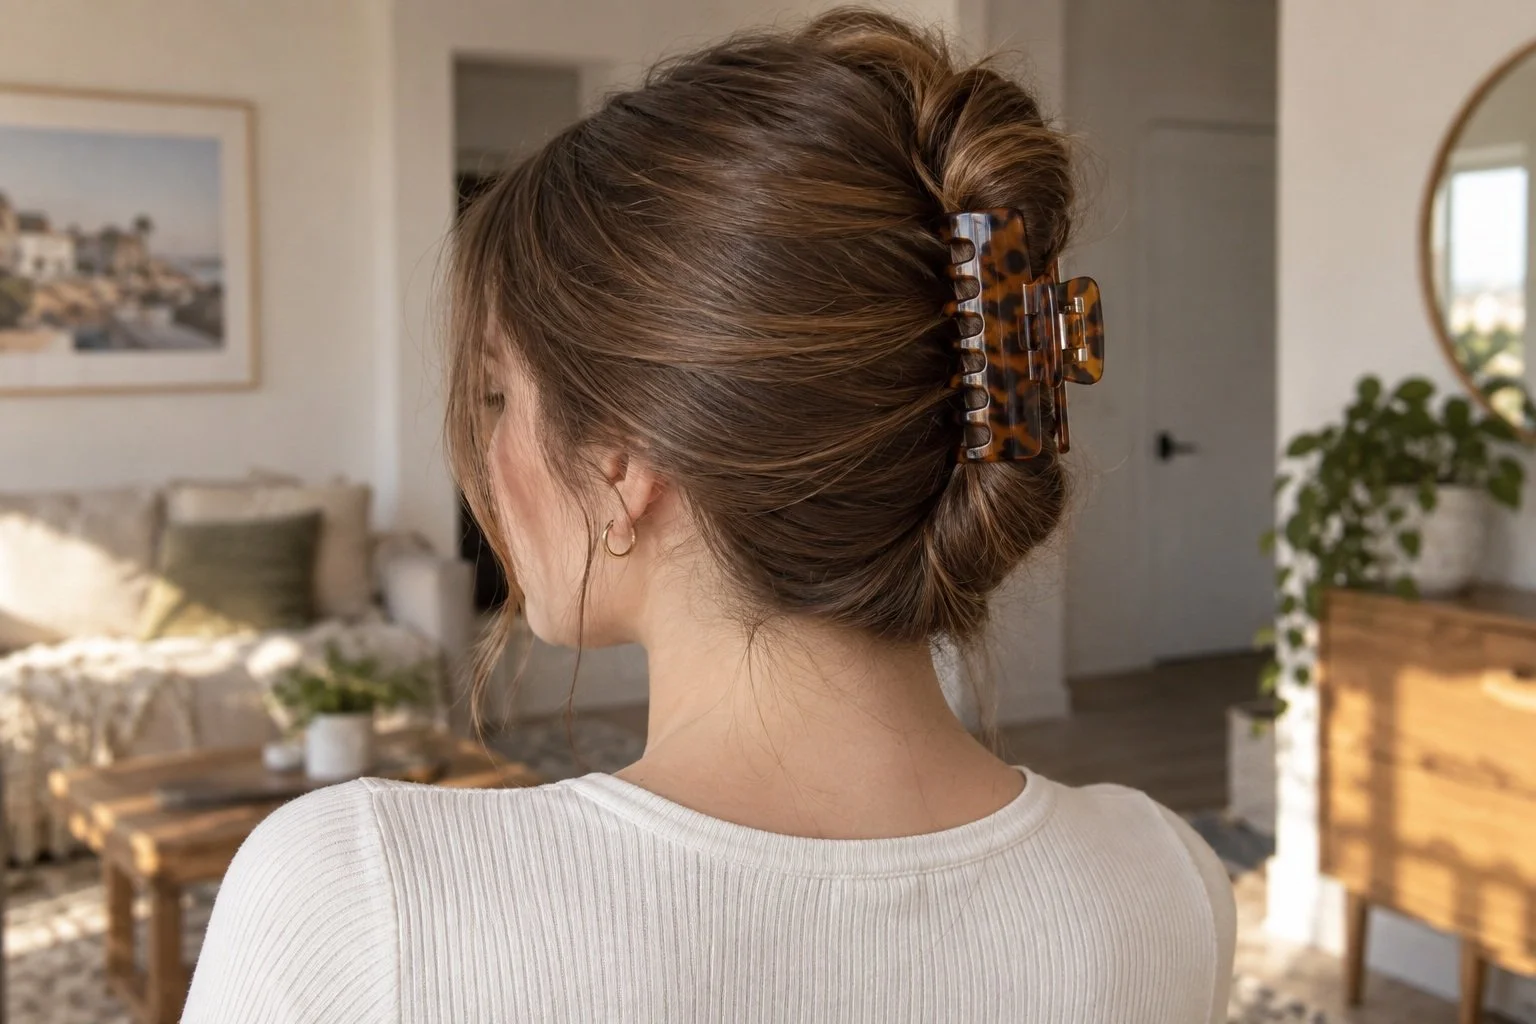
I like this with a basic tee and earrings when I want my hair to look like an actual choice. It also gets everything off my neck without a tight ponytail.
Works best for: Medium to long hair.
You'll need: Large claw clip; optional bobby pins.
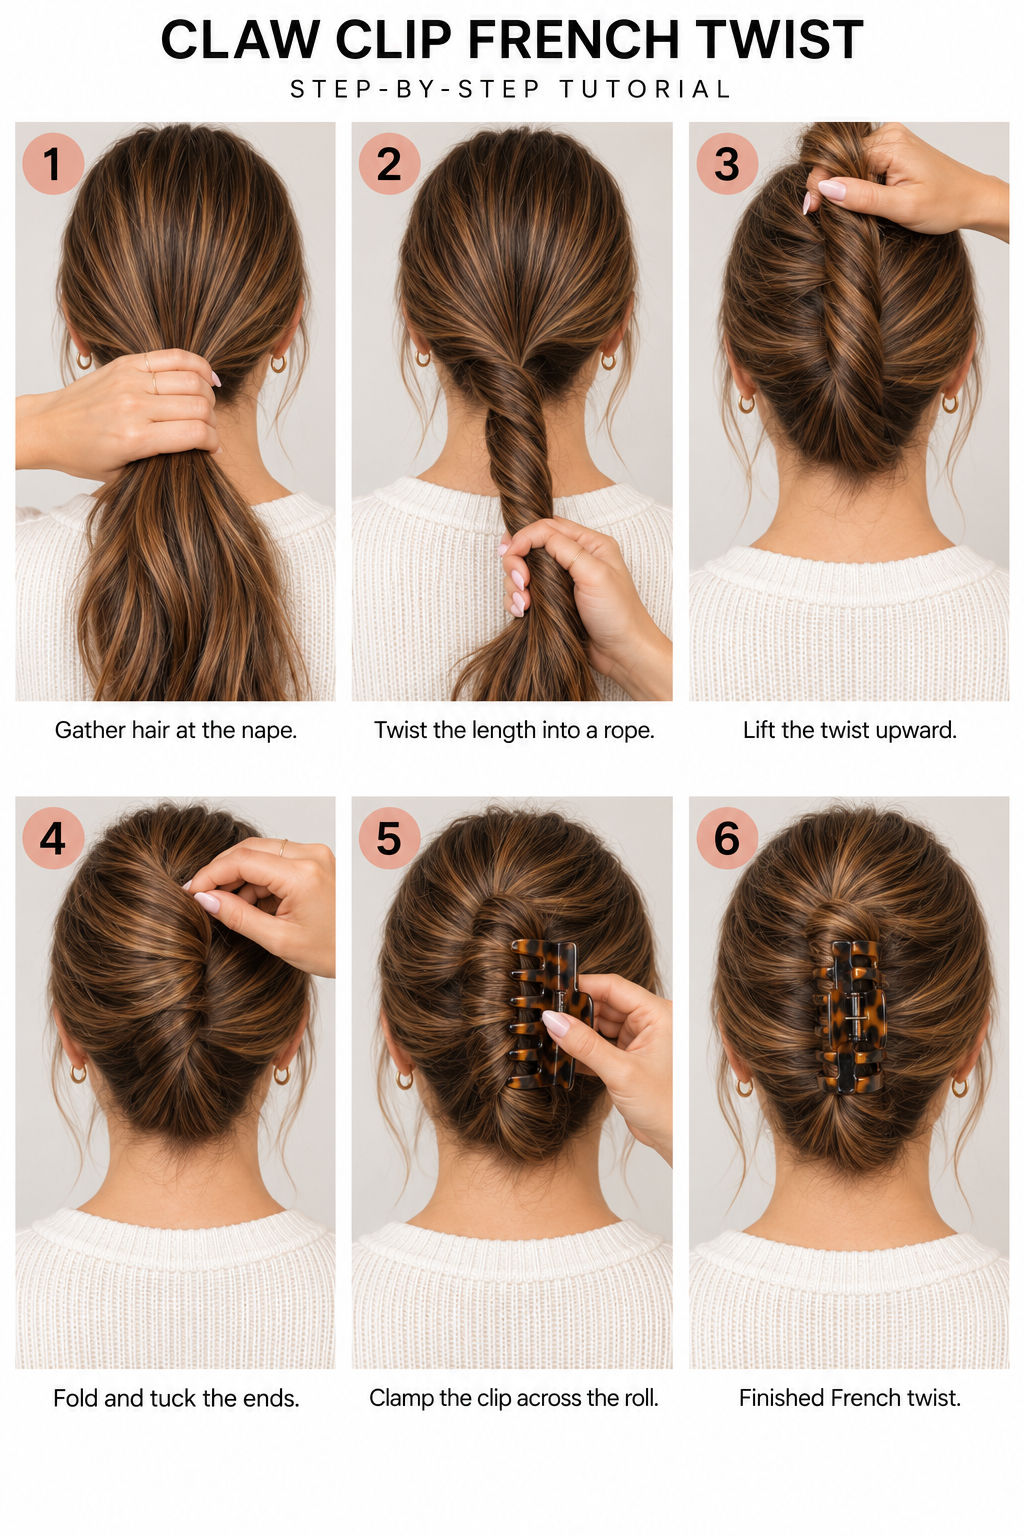
Gather your hair at the nape, as if you’re making a low ponytail. Hold it with your hand, without an elastic.
Twist the length into a loose rope and lift it vertically against the back of your head.
Fold any length that reaches above the twist back down, tucking the ends behind the roll. Keep one hand on it.
Open your claw clip and clamp it across the roll so the teeth catch both the twisted hair and the hair against your head.
If the clip only grabs the outside of the twist, the whole thing will slide. Use a clip that closes comfortably around your hair instead of forcing a tiny one to do overtime.
2. Half-Up Mini Claw Clip
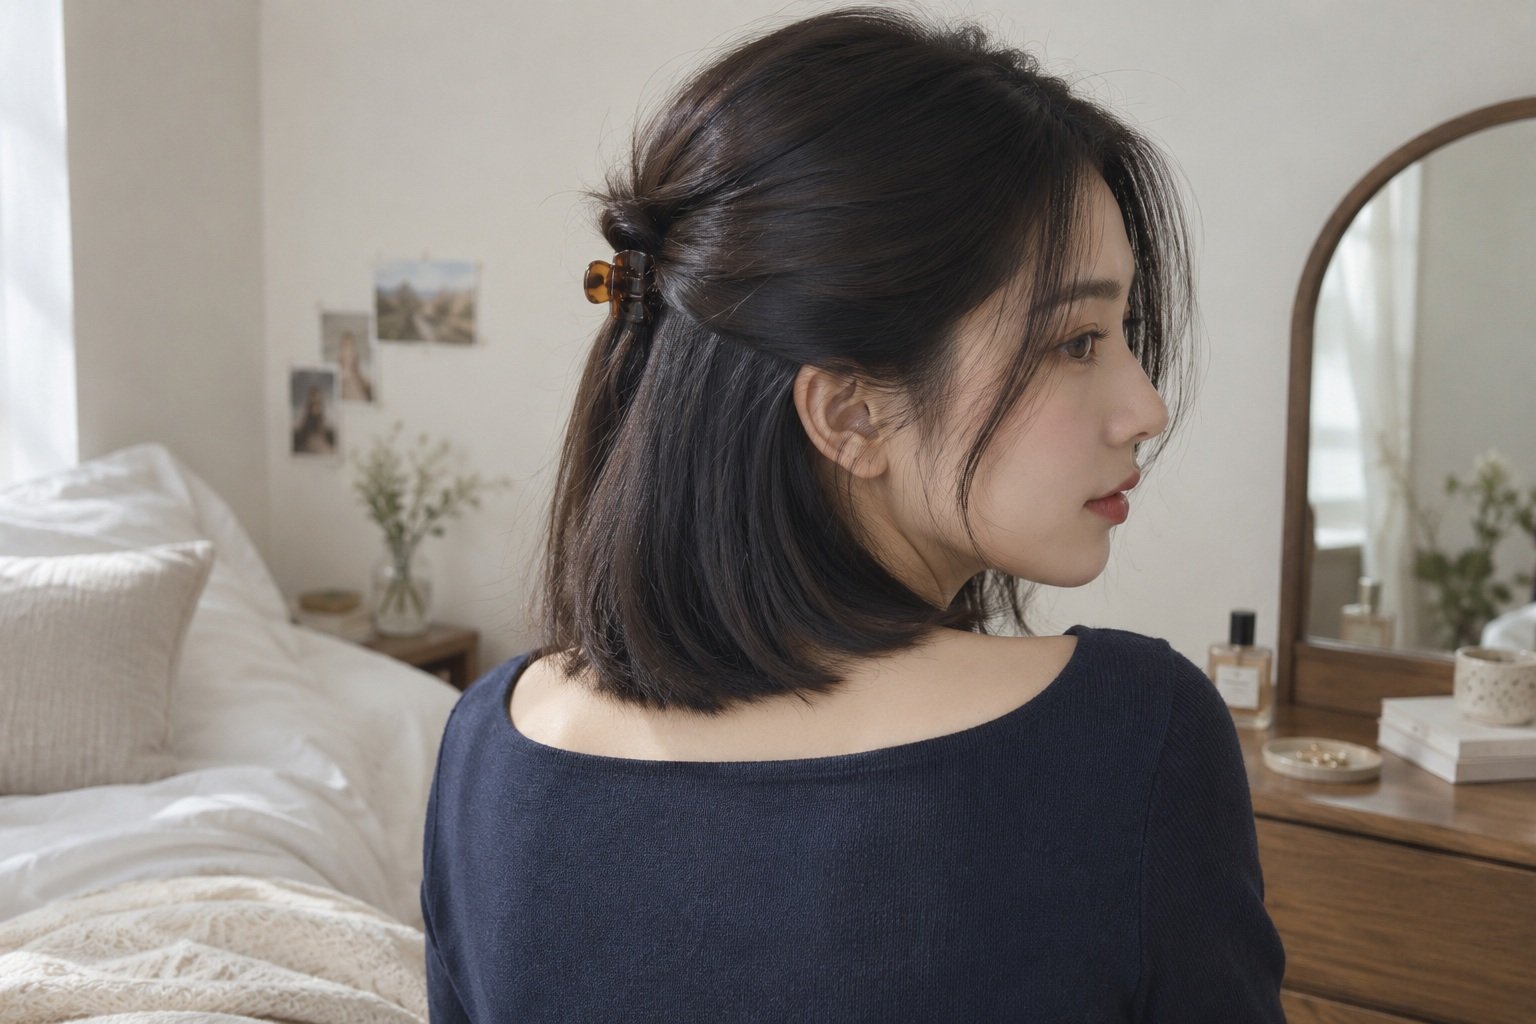
This is my pick when I want my hair down but cannot deal with it falling into my face. A tiny clip makes even a plain outfit feel a little more intentional.
Works best for: Medium or long hair, including many bobs.
You'll need: Mini claw clip.
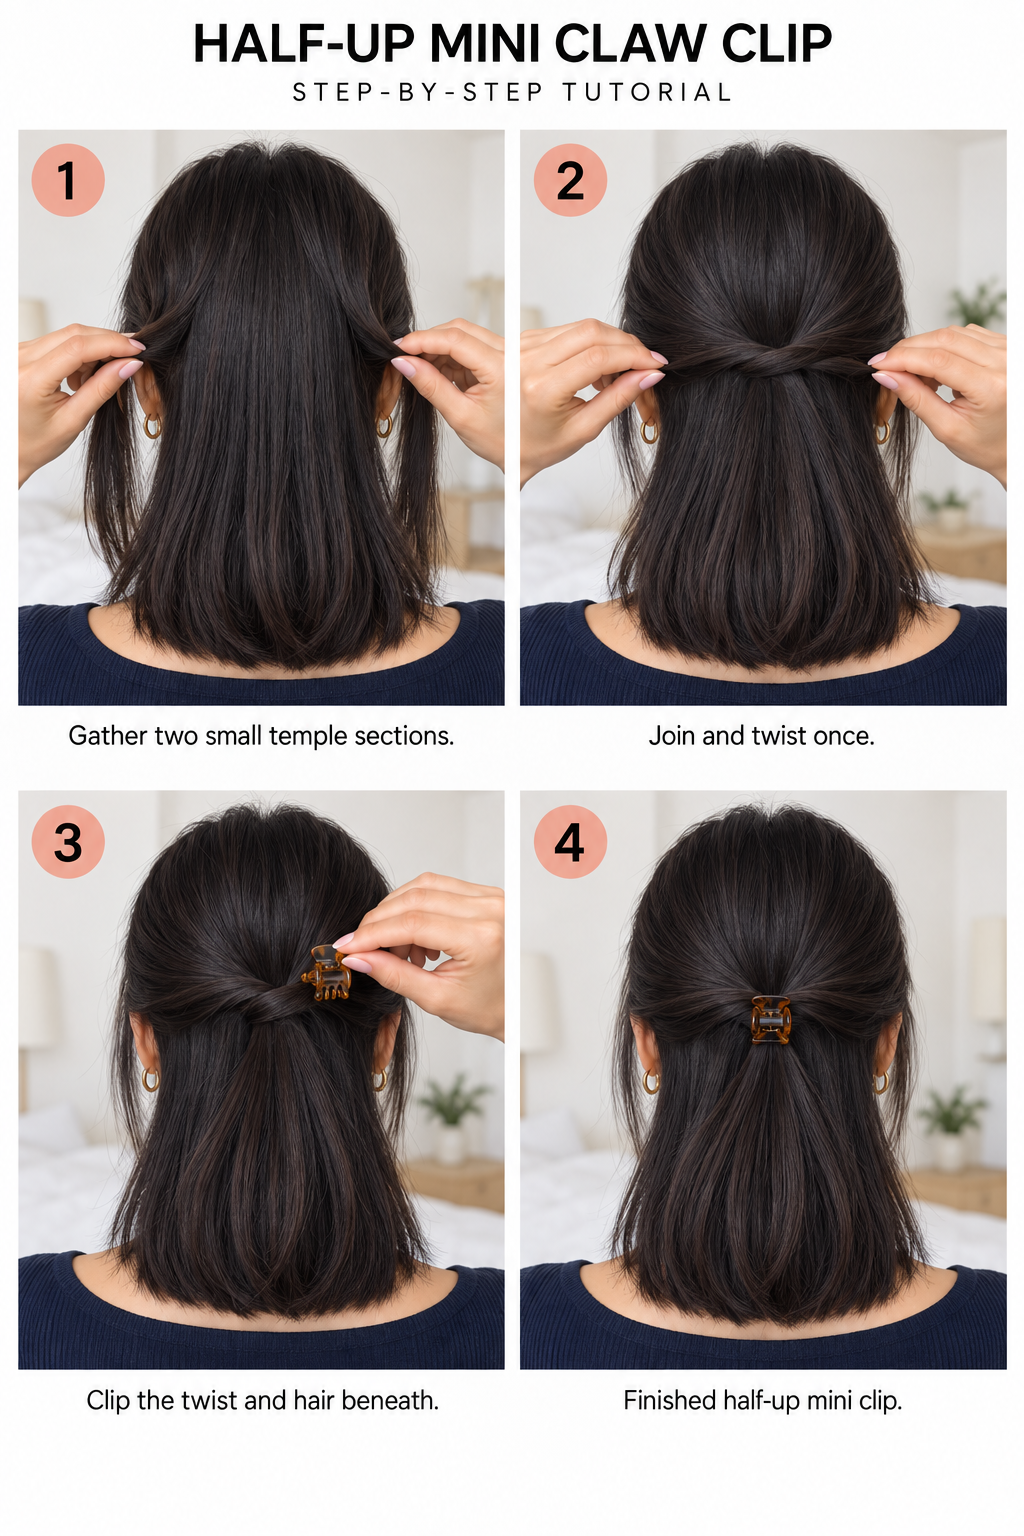
Take a small section from each temple, leaving most of your hair down.
Bring the sections together at the back of your head and give the joined hair one twist.
Clip across that twist, catching a little hair underneath to anchor it. Let the ends hang over the loose hair.
Start with less hair than you think you need. Overloading a mini clip is usually why it pops open.
3. Messy Claw Clip Bun
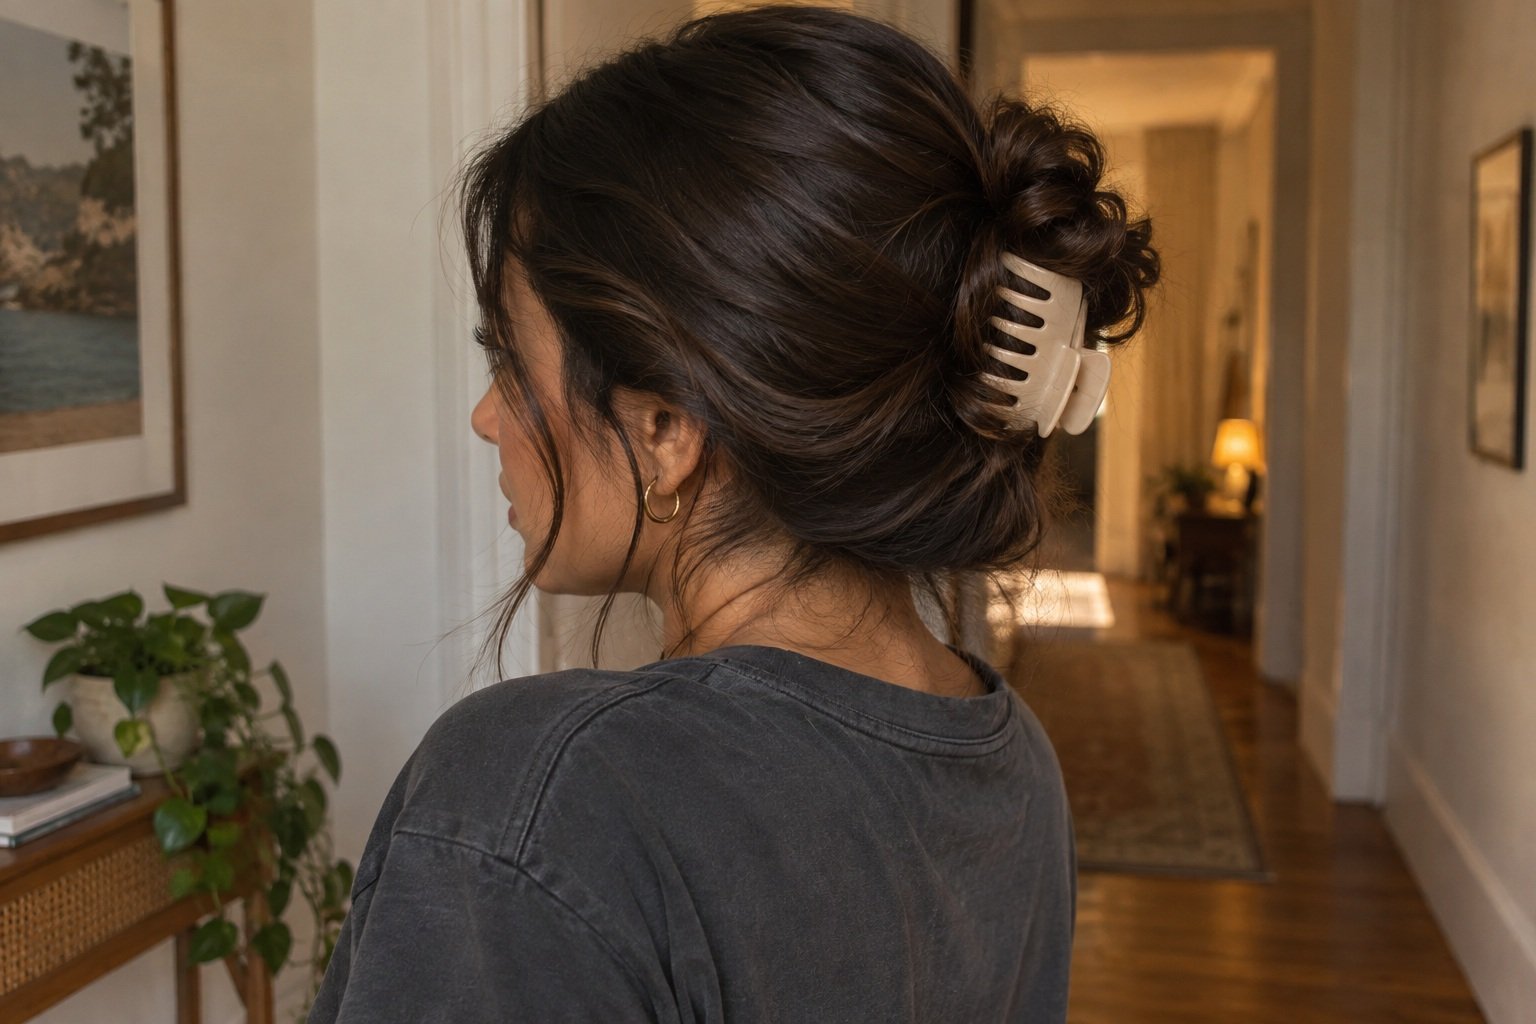
A messy bun without fighting an elastic? Yes, please. I’d wear this for errands, working at home, or any day my hair has already been in three different styles.
Works best for: Medium to long hair.
You'll need: Large claw clip.
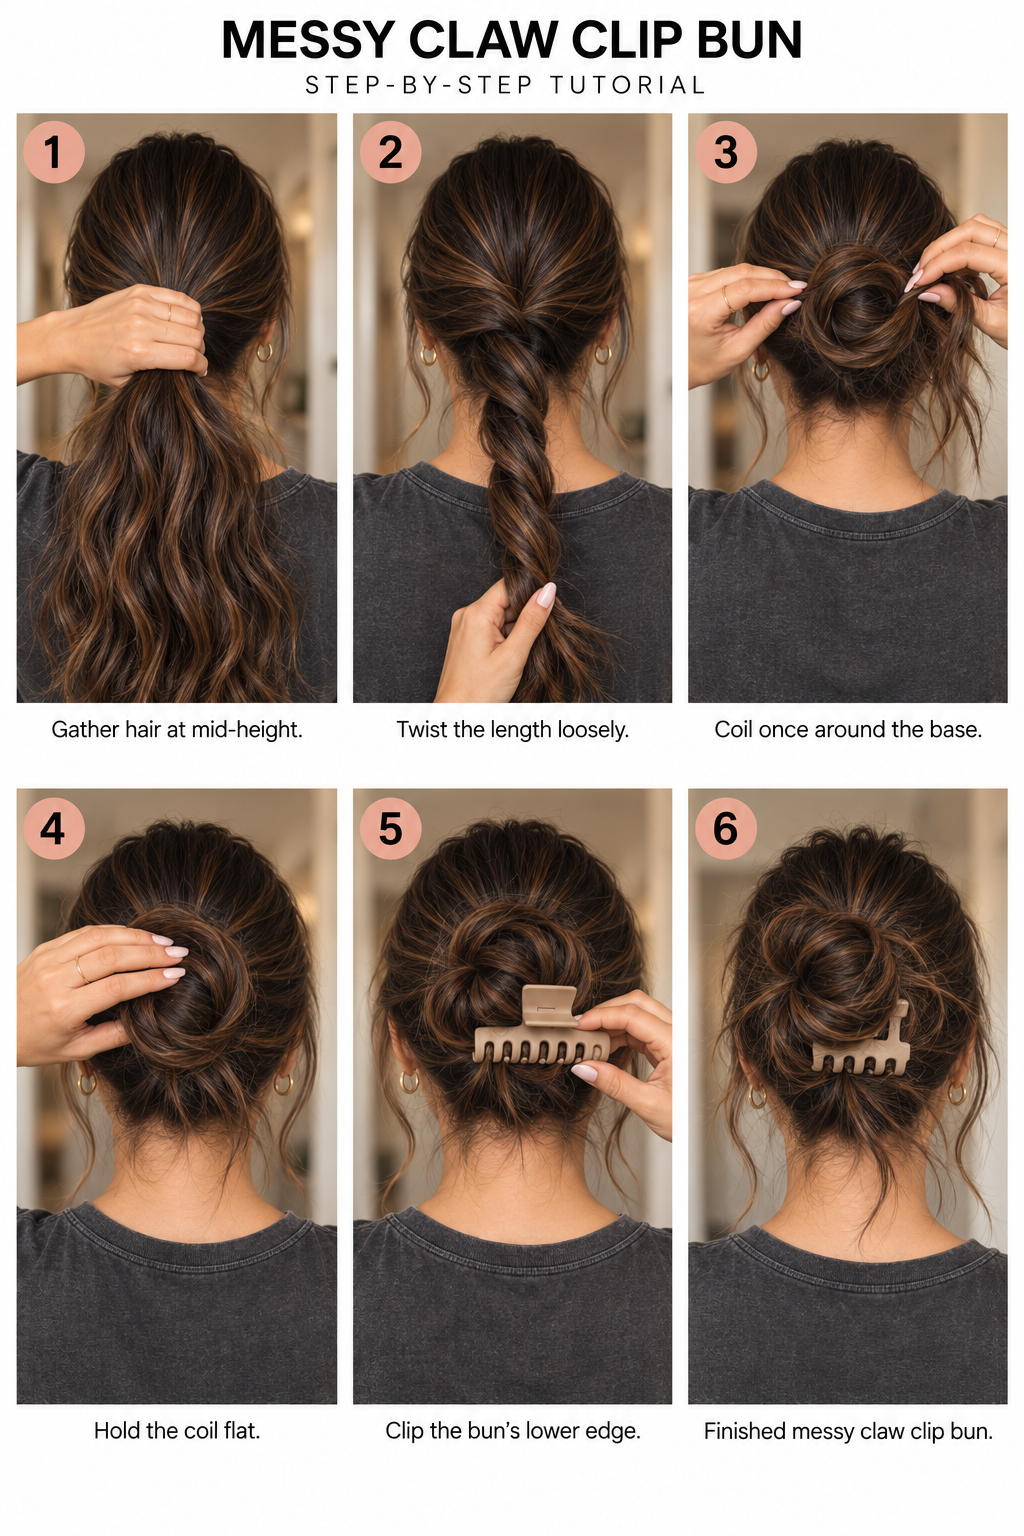
Gather your hair into a ponytail with your hand at the middle of the back of your head.
Loosely twist the length and coil it around the base once to form a bun.
Hold the coil flat and clamp a large clip across its lower edge, catching the bun and the hair beneath it. Leave a few ends out.
The clip needs an anchored edge to grip, not the entire thickness of a giant bun. For very thick hair, try a larger clip or the elastic-secured messy bun below.
4. Claw Clip Ponytail Hack
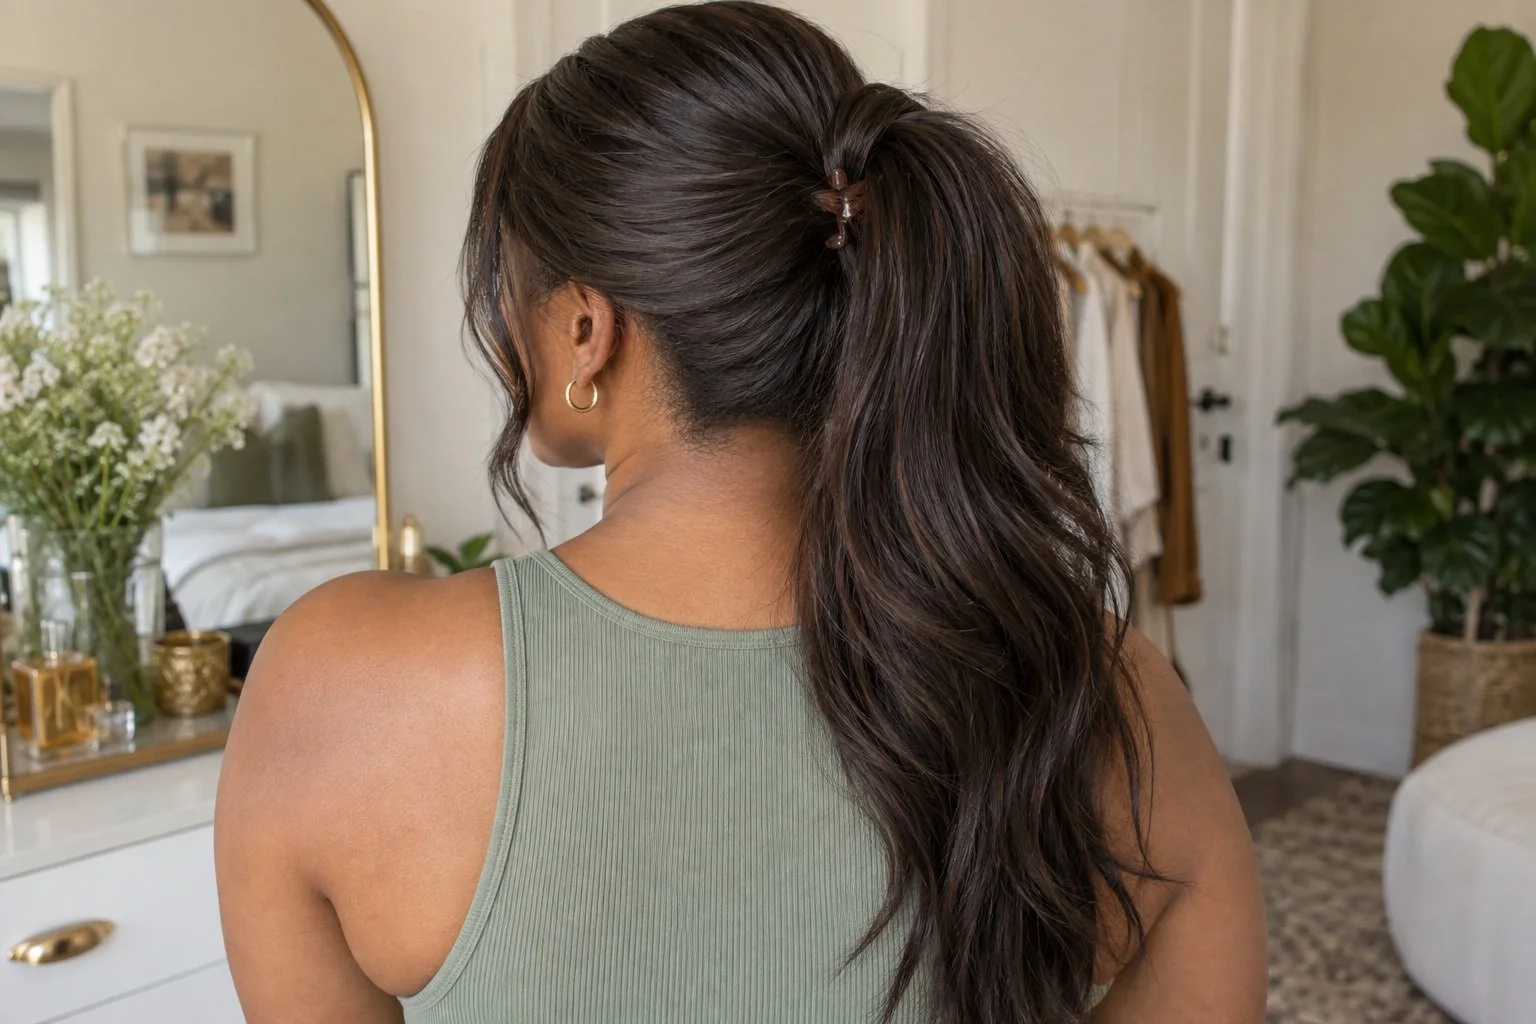
This gives a regular ponytail a little lift without teasing it into a bird’s nest. I like it when the ponytail looks great from the front and completely flat from the side.
Works best for: Medium to long hair with enough density to cover a mini clip.
You'll need: Hair elastic; small lightweight claw clip.
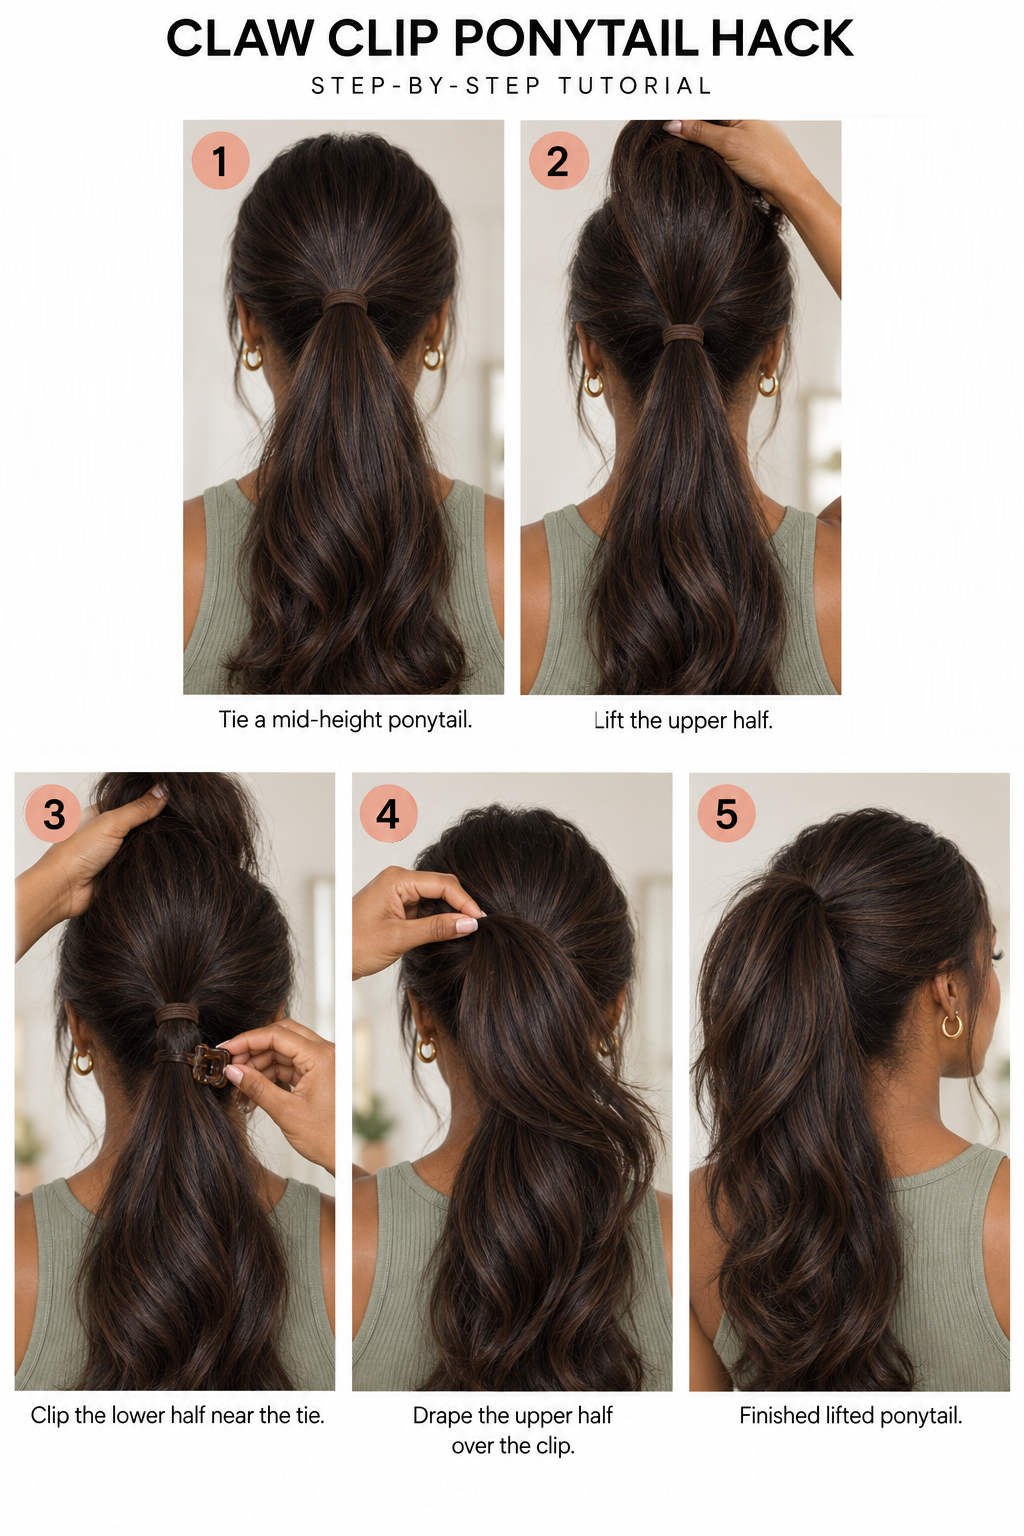
Secure a ponytail at the middle of the back of your head with an elastic.
Split the hanging ponytail into a top half and bottom half. Lift the top half out of the way.
Clamp a small claw onto the lower half immediately below the elastic. Keep the clip close to the base.
Lay the upper half over the clip and spread the hair gently to cover it.
Use a genuinely small clip. A large one is harder to hide and can feel heavy. If your hair is fine, skip this trick if the clip stays visible.
5. Sleek Claw Clip With Spiky Ends
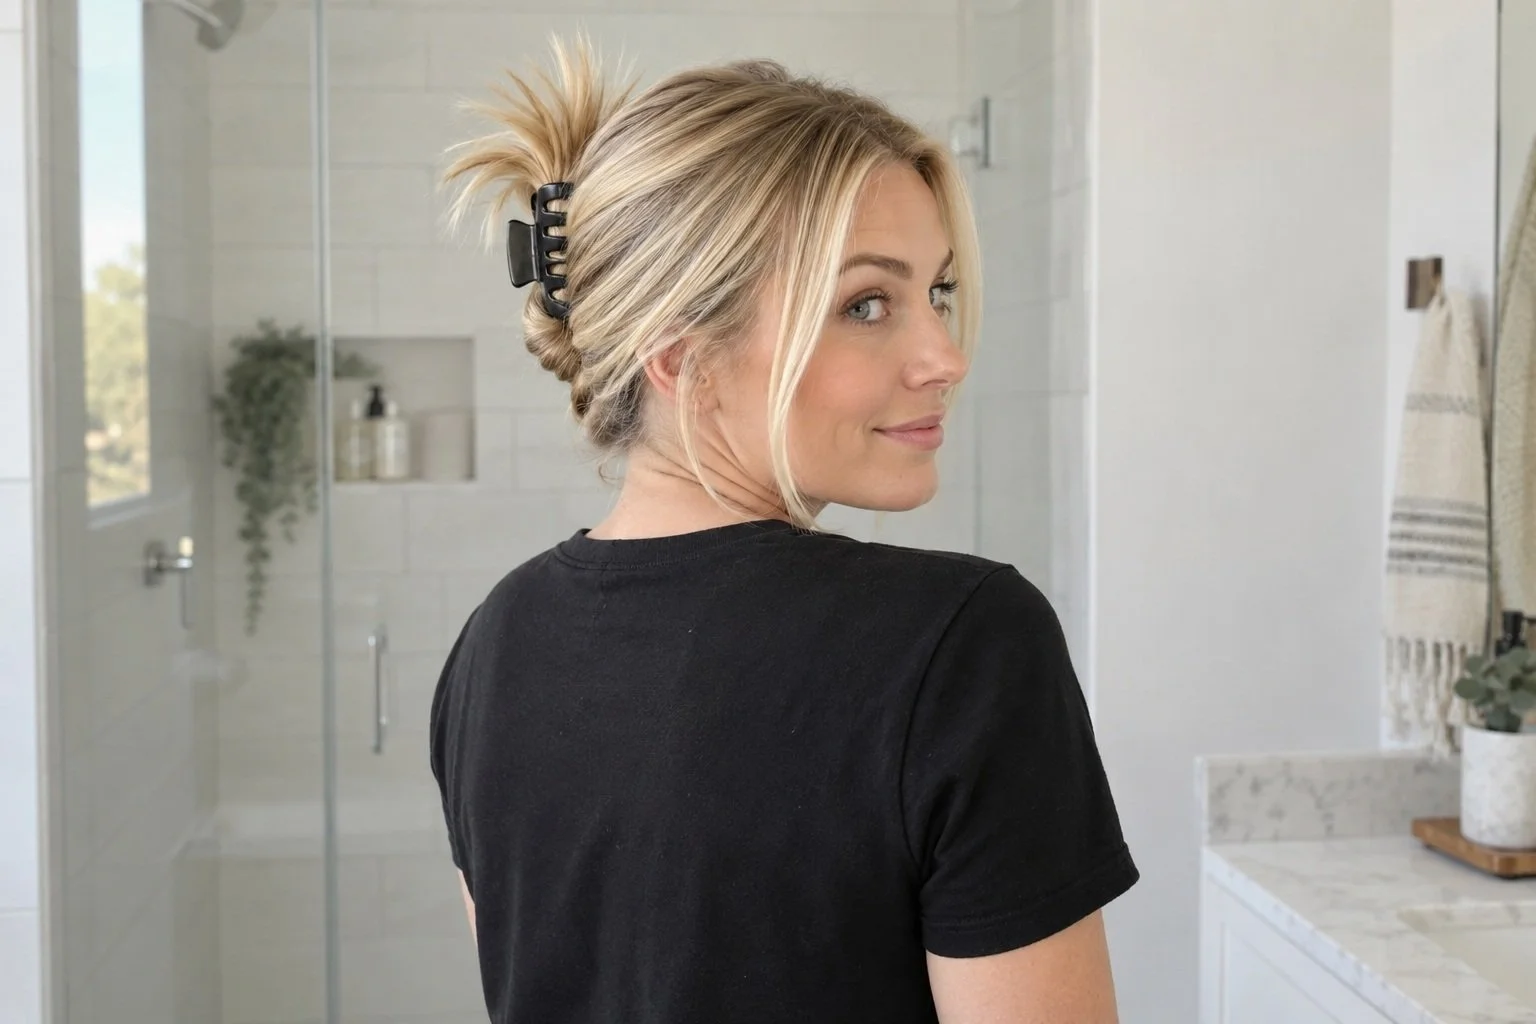
This has that slightly ’90s thing going on that I love with a simple top. The ends are supposed to stick out, so you can stop trying to tuck every last piece away.
Works best for: Medium hair; shorter ends are easiest.
You'll need: Brush; medium claw clip; optional light gel.
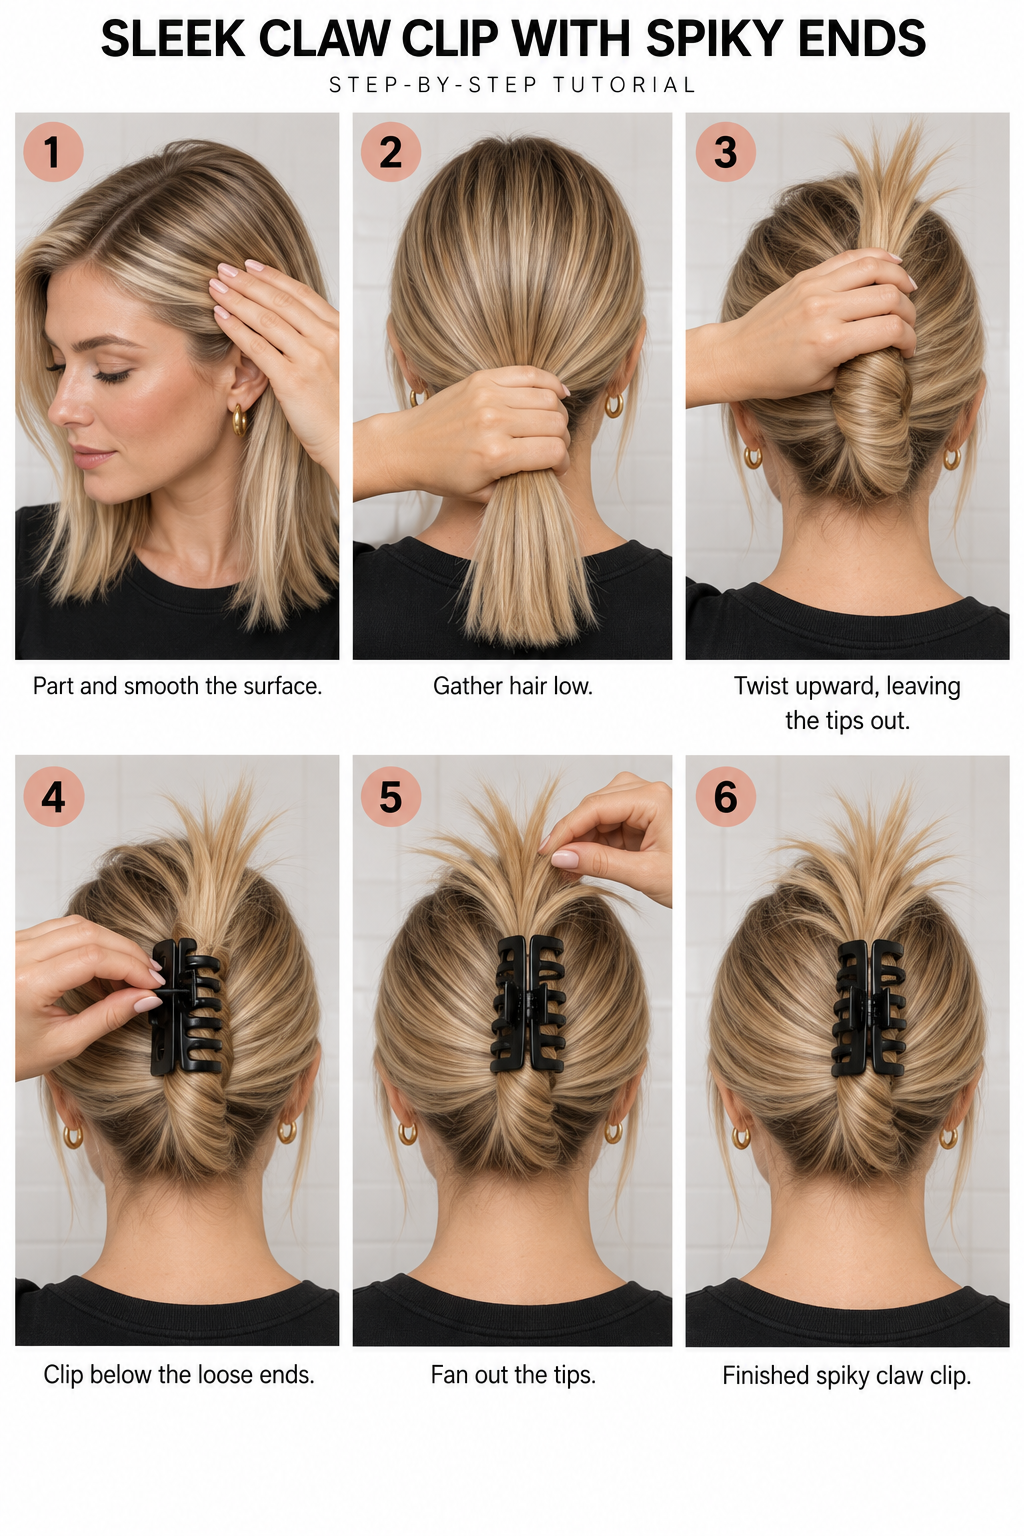
Part your hair and smooth it back into a low handful. Add a little gel to the surface if you want.
Twist the gathered hair upward against your head, leaving the last few inches pointing up.
Clamp a claw clip around the twist and the hair beneath it, below the loose ends.
Separate the ends into a small fan with your fingers.
Long hair can be folded back into the twist before clipping, leaving just the tips out. Naturally curly ends will make a soft curl fan instead of straight spikes.
I’d pair this one with one of these graphic tee outfits for an easy casual look.
6. Slicked-Back Low Bun
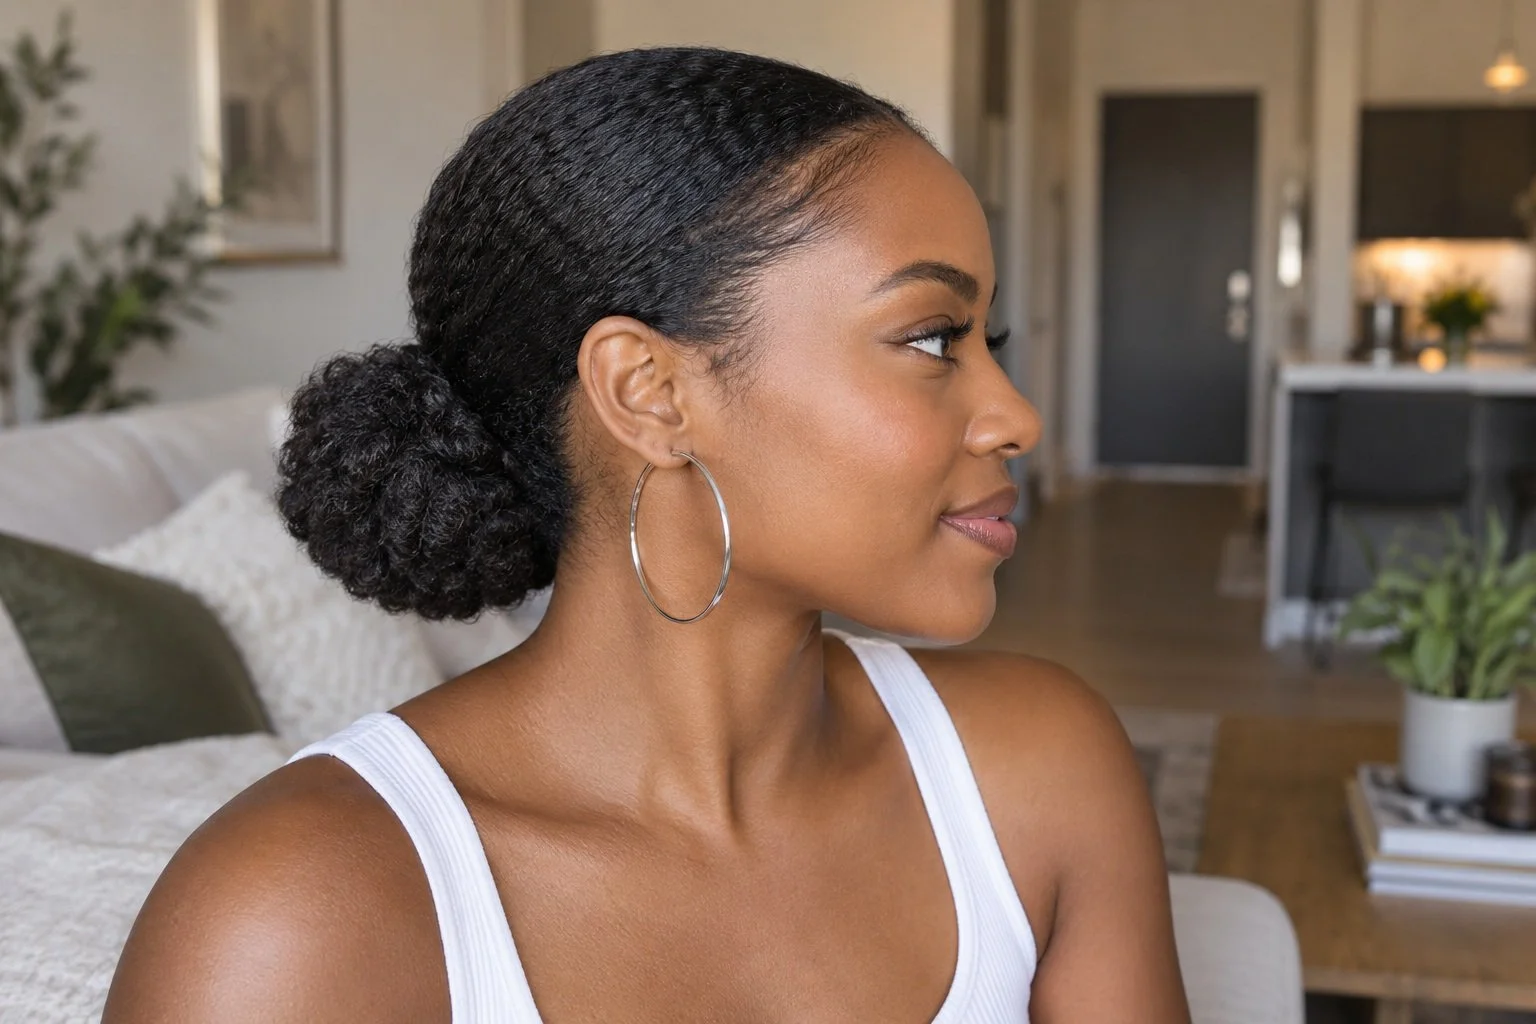
For the days when the outfit is cute and the hair is refusing to participate. A low bun makes everything feel pulled together, especially with earrings.
Works best for: Medium to long hair that reaches a low ponytail.
You'll need: Brush; two elastics; light gel; optional bobby pins.
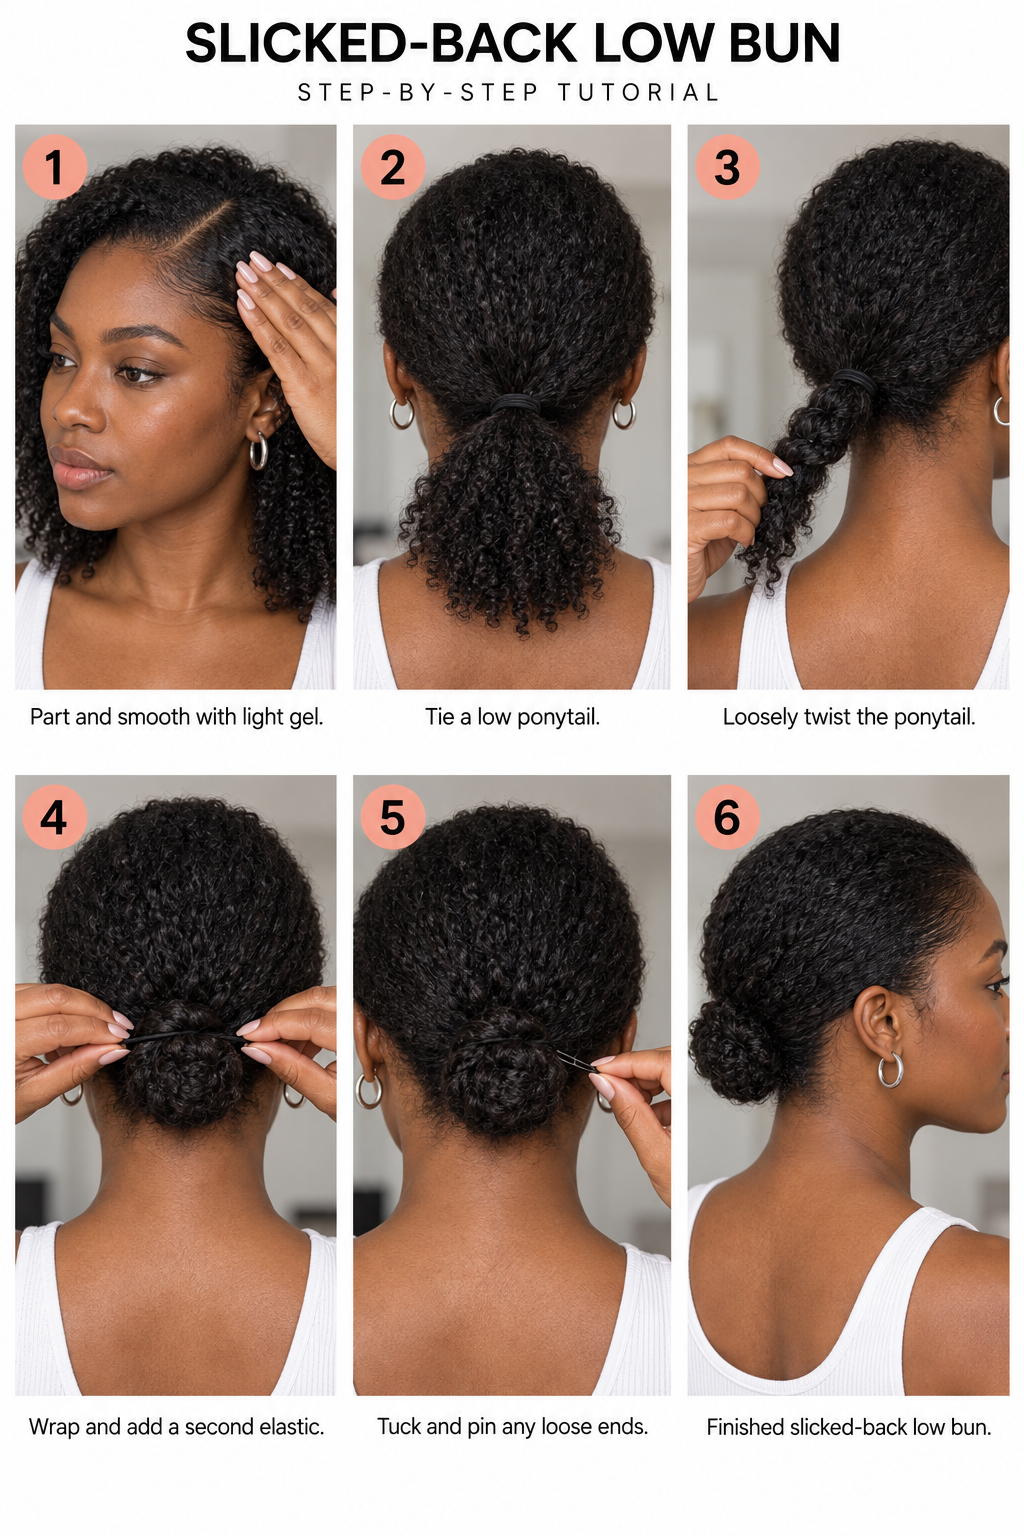
Make your part, then smooth the surface back with a brush and a little gel.
Secure a low ponytail at the nape. It should feel secure without pulling at your hairline.
Twist the ponytail loosely, wrap it around the base, and secure the bun with a second elastic.
Tuck any loose ends under the bun and pin them if needed.
Smooth doesn’t have to mean painfully tight. Work with your texture, and use your hands to shape the bun if twisting makes it too compact.
7. Loose Low Bun + Face-Framing Pieces
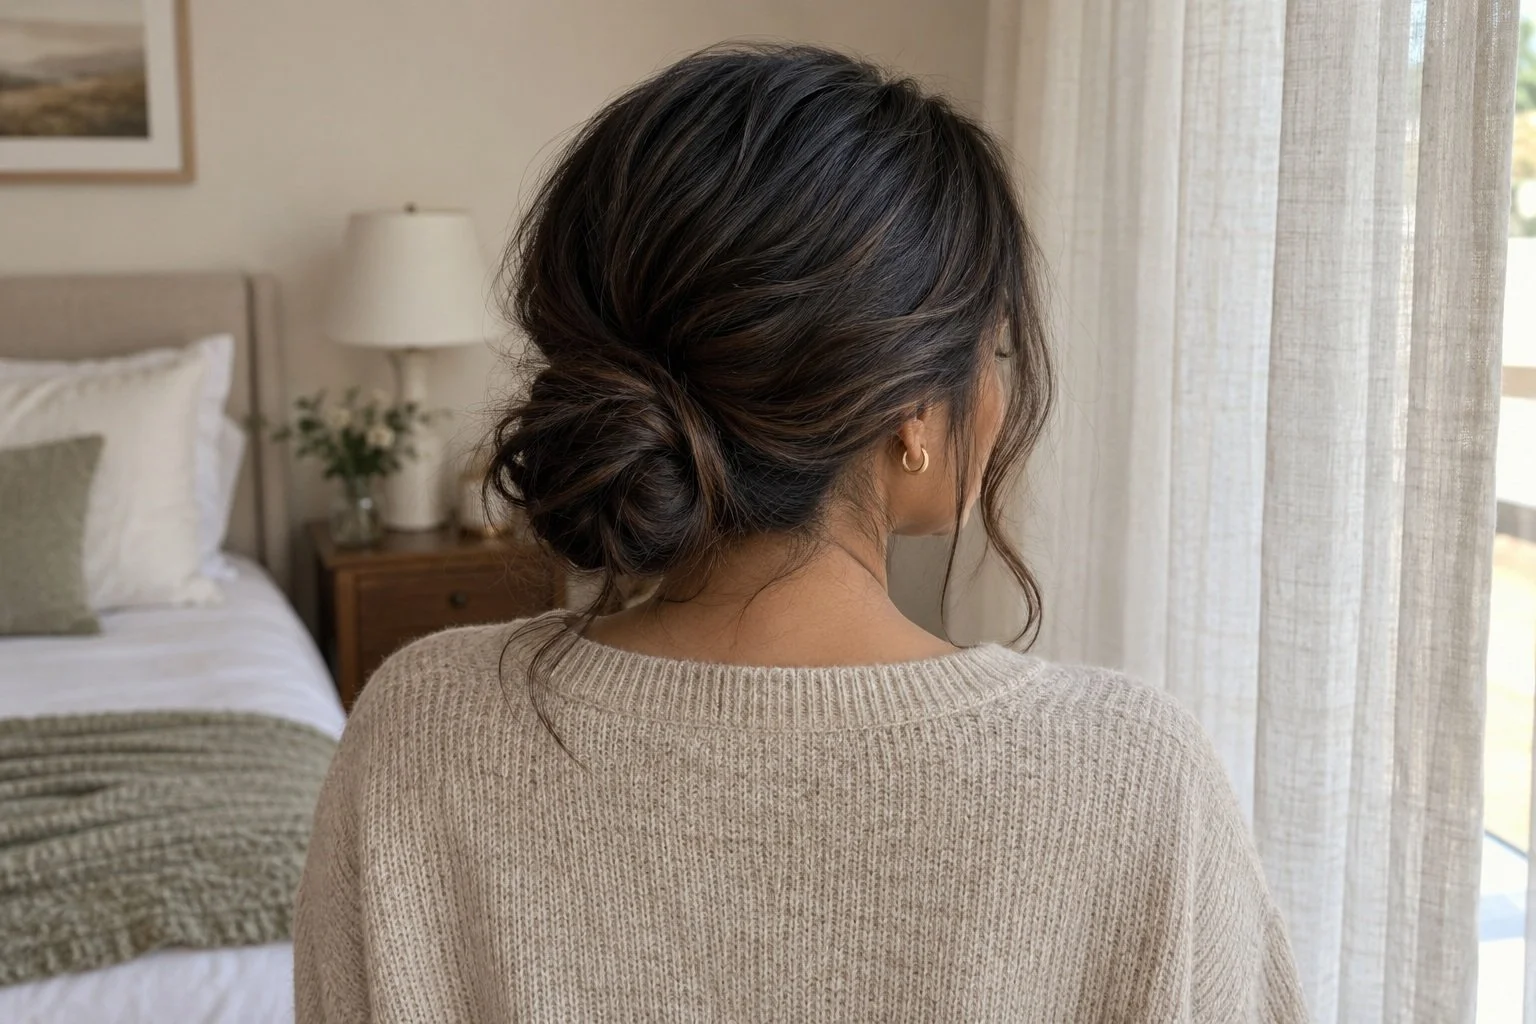
This is the softer version of the low bun, and I’d pick it for a dinner out or a dress-and-cardigan kind of day. A few loose pieces do most of the work.
Works best for: Medium to long hair.
You'll need: Two elastics; a few bobby pins.
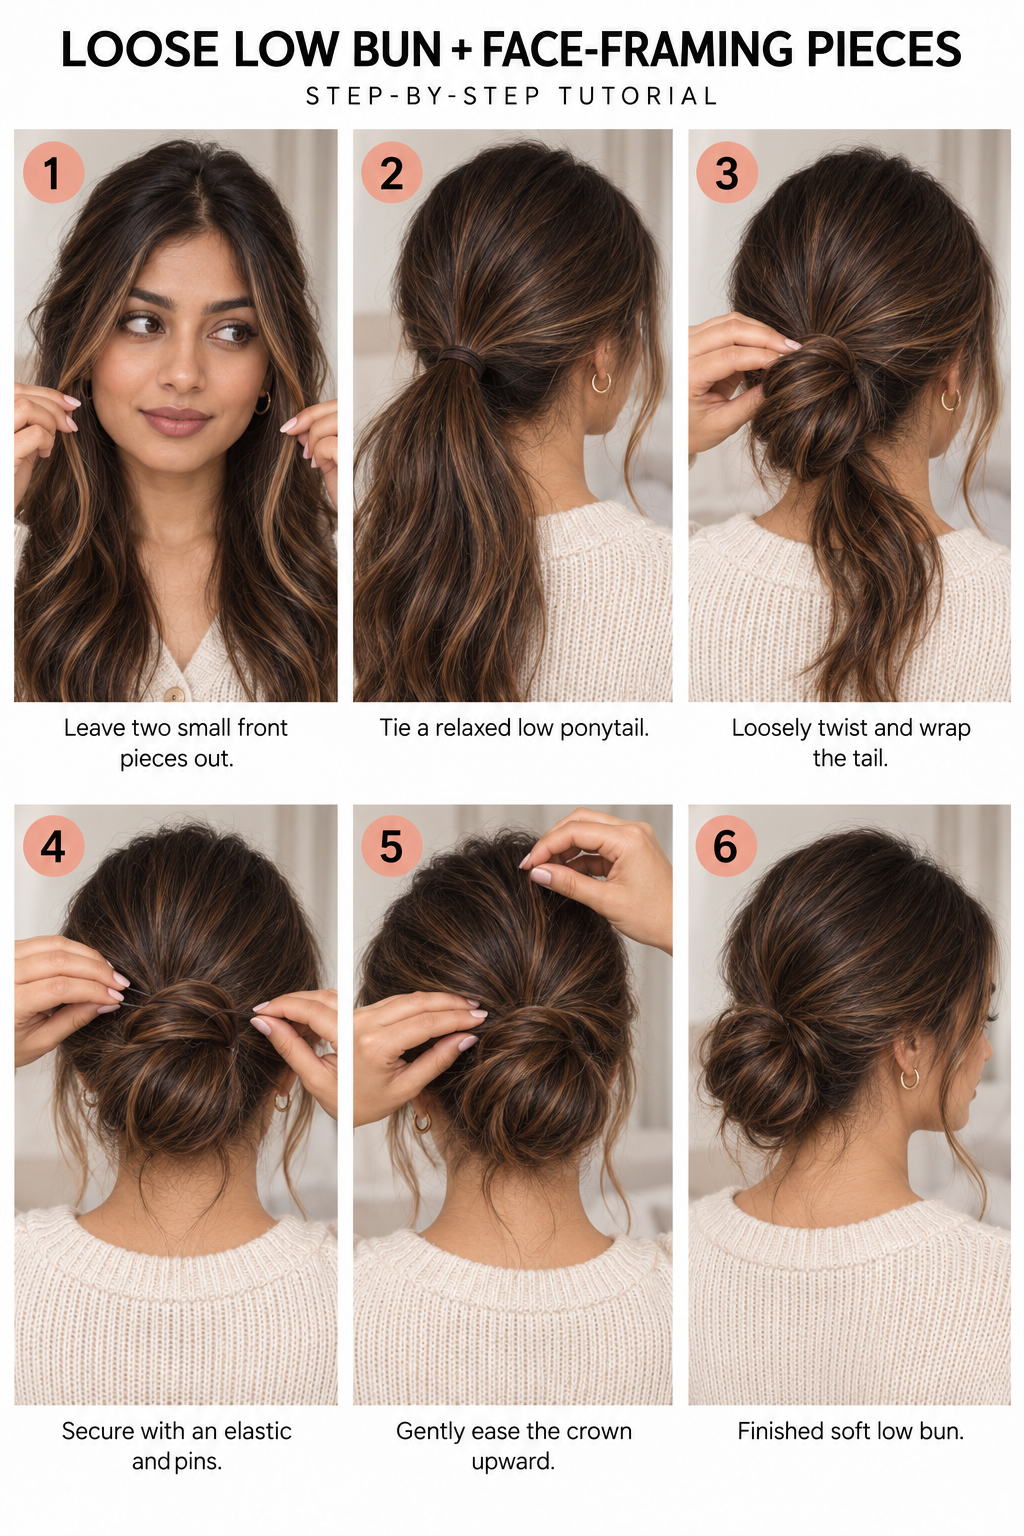
Separate a little hair at the front before gathering the rest. Use your shorter layers if you have them.
Tie a low ponytail, keeping the crown relaxed.
Loosely twist and wrap the ponytail around its base. Secure it with another elastic and pin any escaping ends.
Hold the bun while gently easing out tiny sections at the crown for softness.
Pulling out big front sections can leave you with two heavy curtains. Start small. You can always release a little more.
8. High Messy Bun
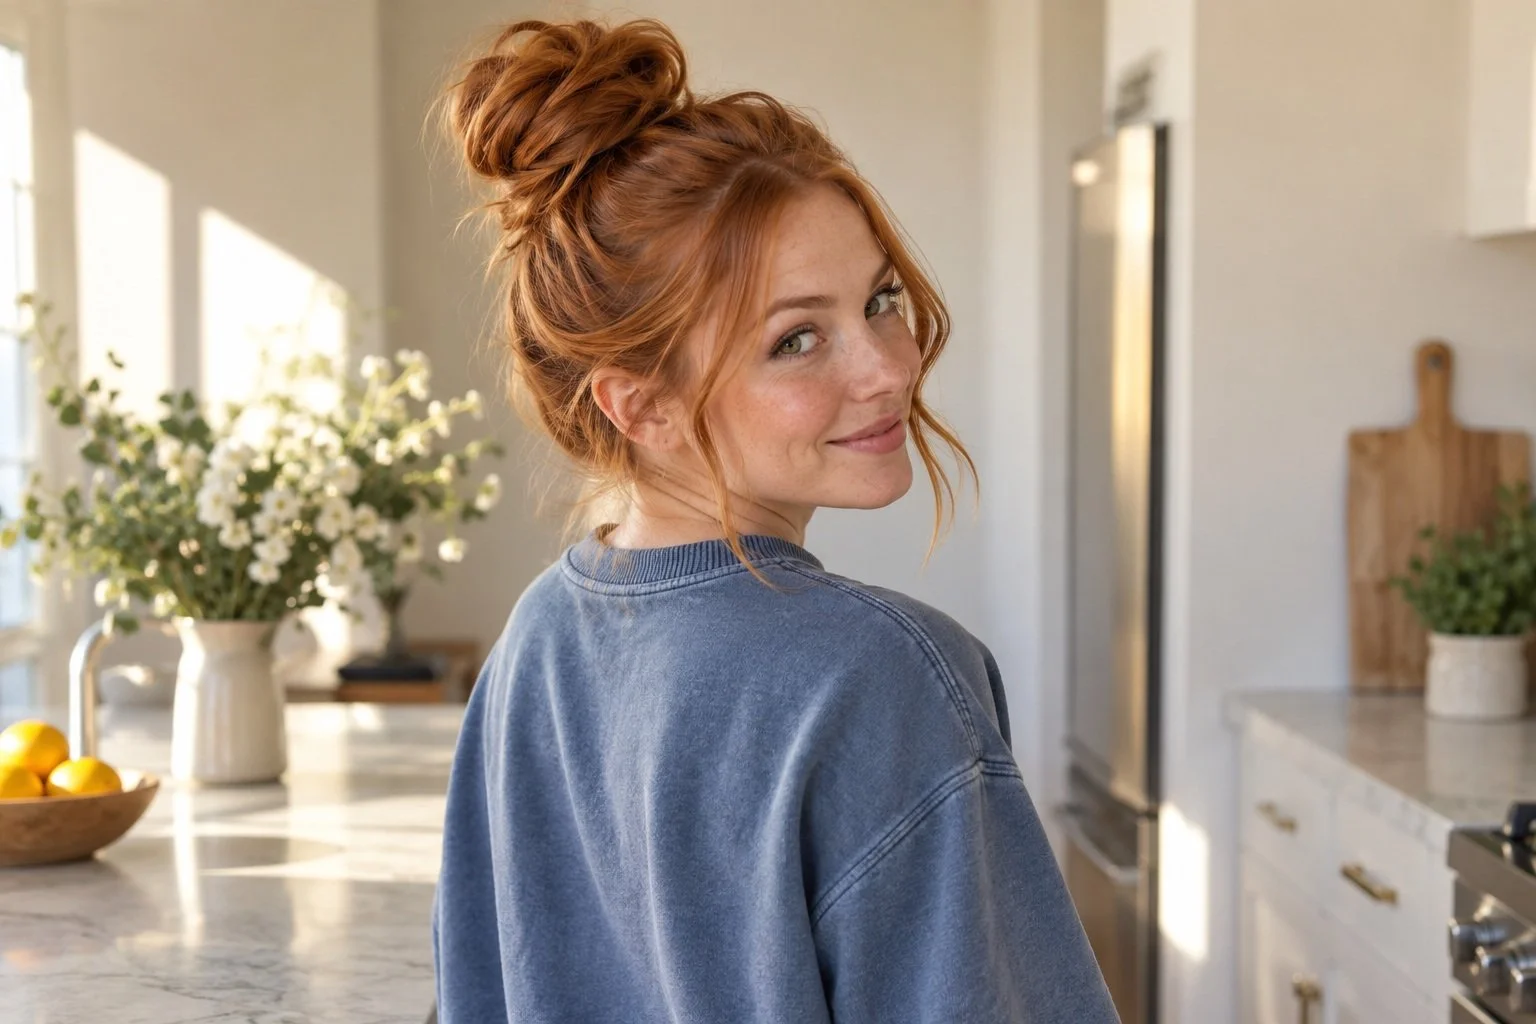
This is for when my hair needs to be up, immediately. The trick is making a loop first instead of twisting until you somehow have a tiny knot on top of your head.
Works best for: Medium to long hair.
You'll need: One sturdy elastic; bobby pins.
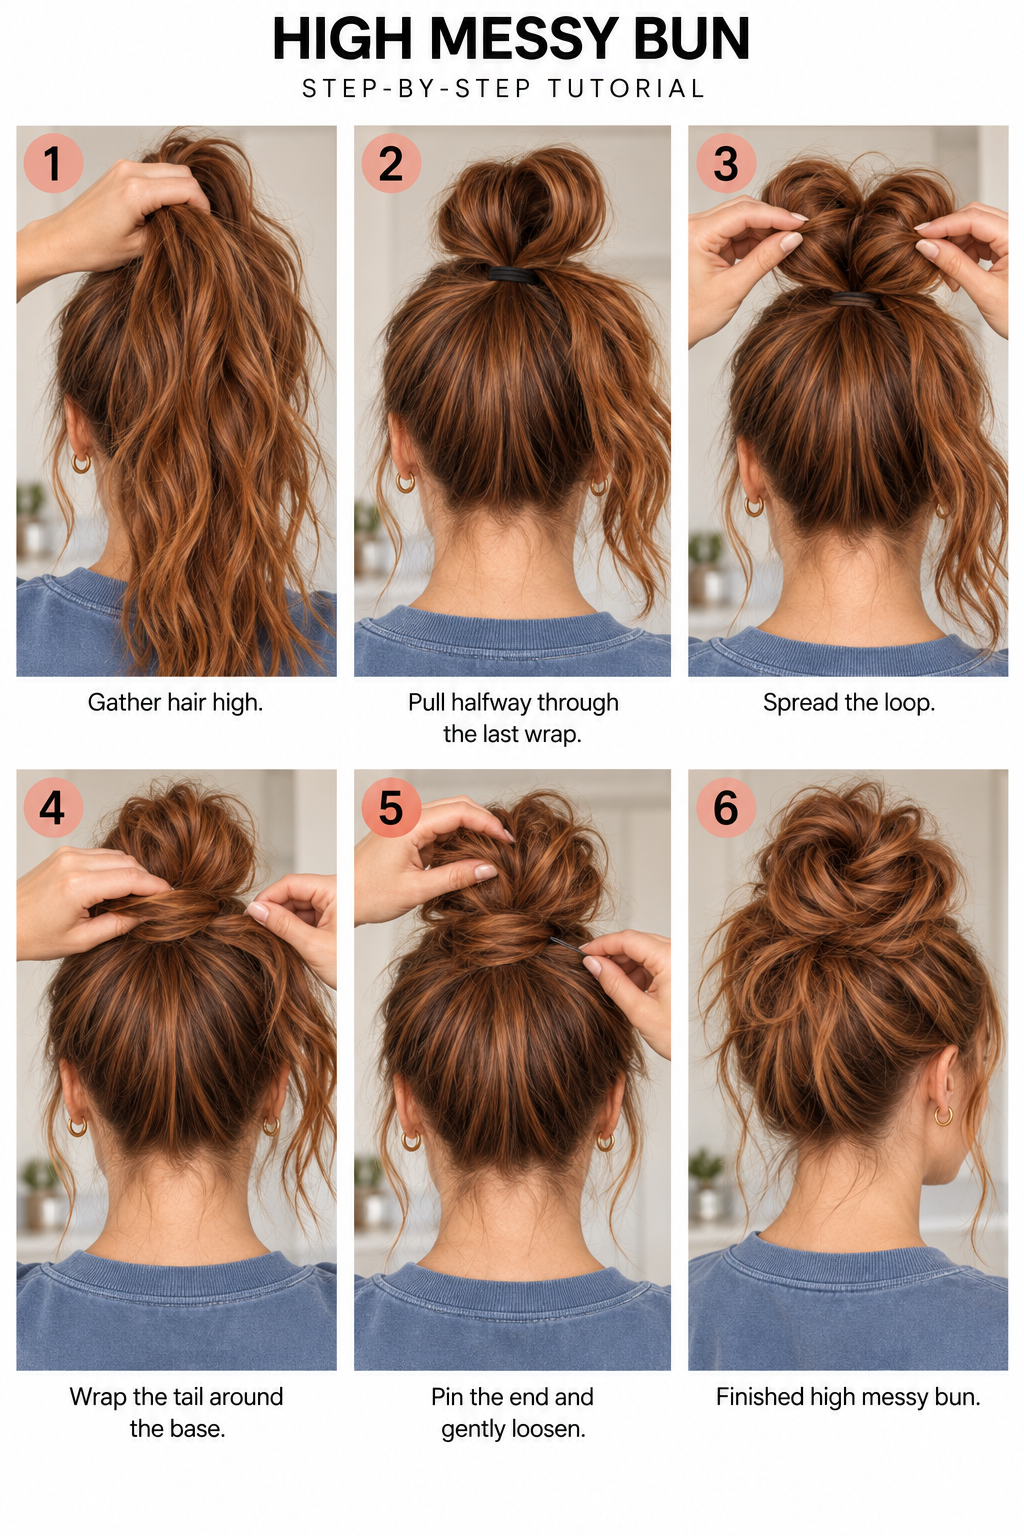
Gather your hair into a high ponytail with your hand.
Begin tying the elastic as usual. On the last pass, pull the hair only halfway through to leave a loop and a loose tail.
Spread the loop into a fuller bun. Wrap the loose tail around the base.
Tuck the tail under the elastic or pin it, then gently loosen the bun with your fingers.
If your hair is very long, make a smaller loop so you don’t end up with a bun taller than your coffee.
9. Bubble Ponytail
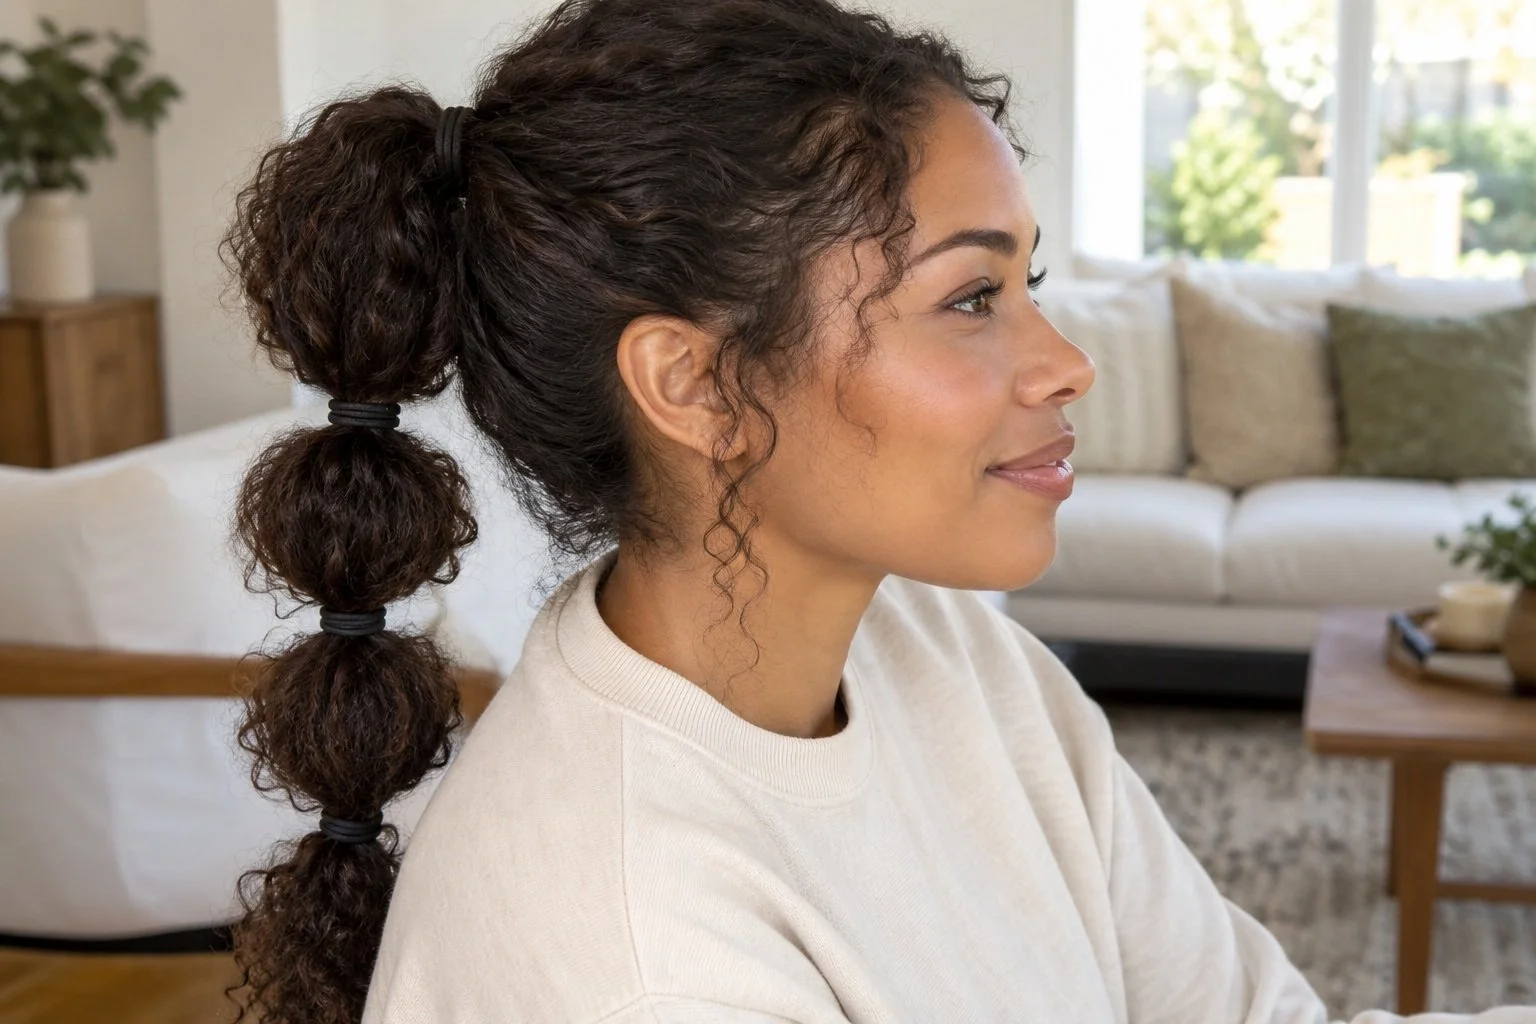
This looks like you did something significantly more complicated than adding a few hair ties. It’s also a good change from the same ponytail on repeat.
Works best for: Long hair; medium hair can make fewer bubbles.
You'll need: Four snag-free elastics for three bubbles.
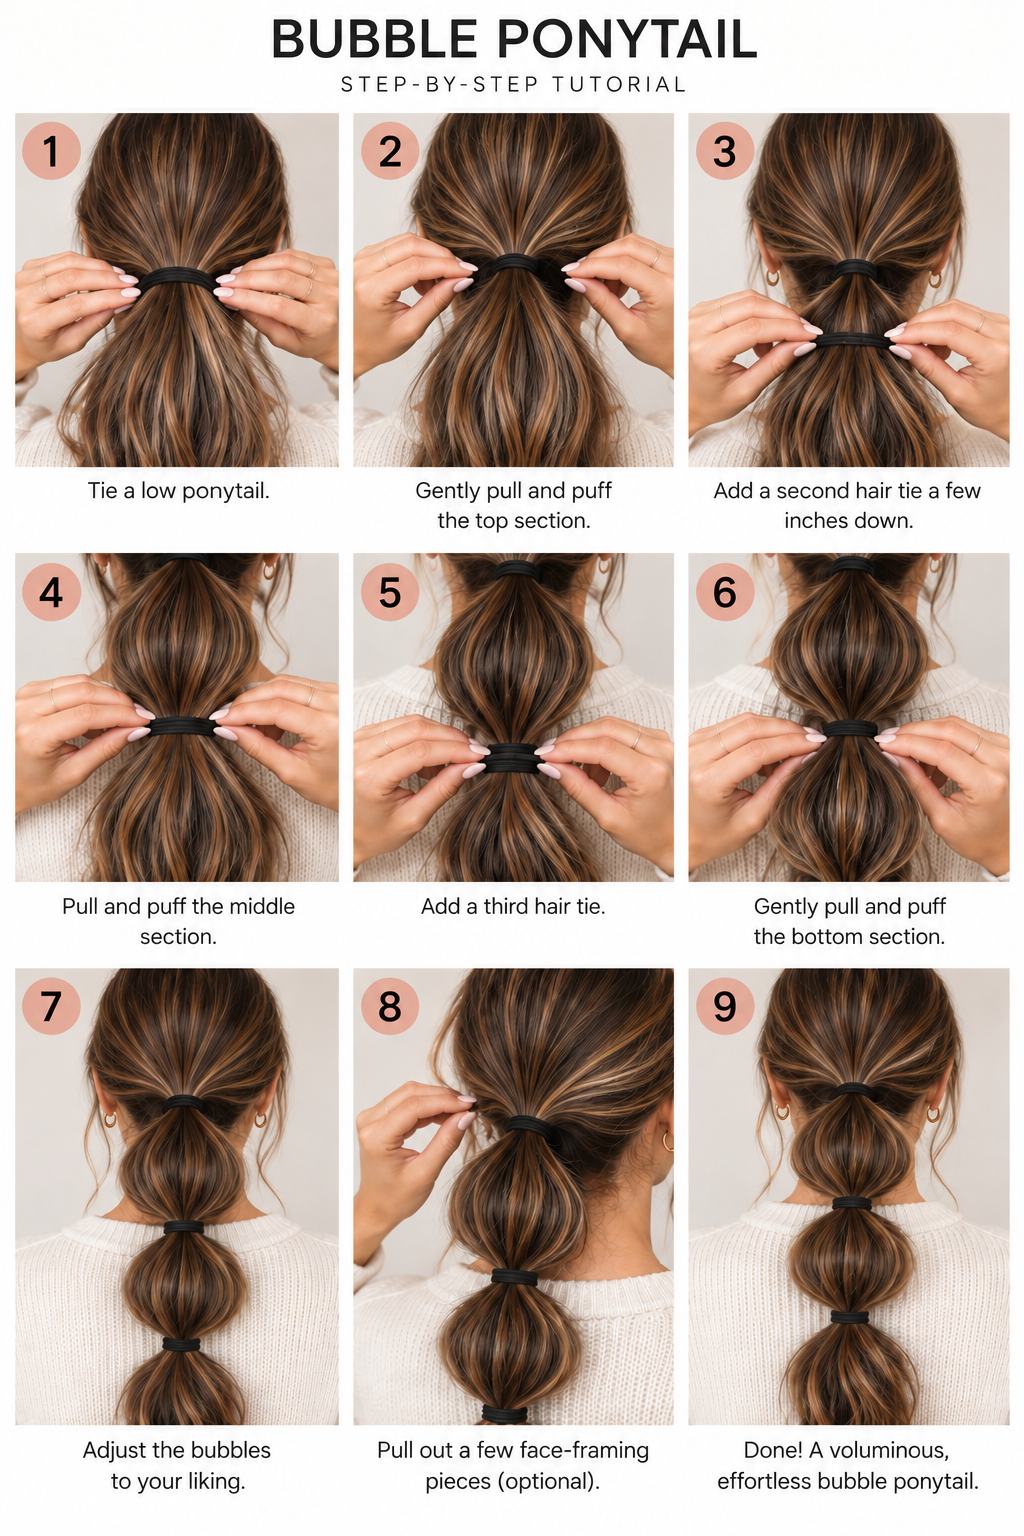
Tie your hair into a mid-height ponytail.
Add a second elastic a few inches below the first. Gently pull the hair between them outward to form a rounded bubble.
Add another elastic the same distance down and puff out that section.
Repeat once more if you have enough length. Leave the tips loose rather than forcing in a tiny final bubble.
Shape each bubble before adding the next elastic. On curly hair, expand the section gently without brushing the curls out.
10. Low Pony + Wrapped Hair Tie
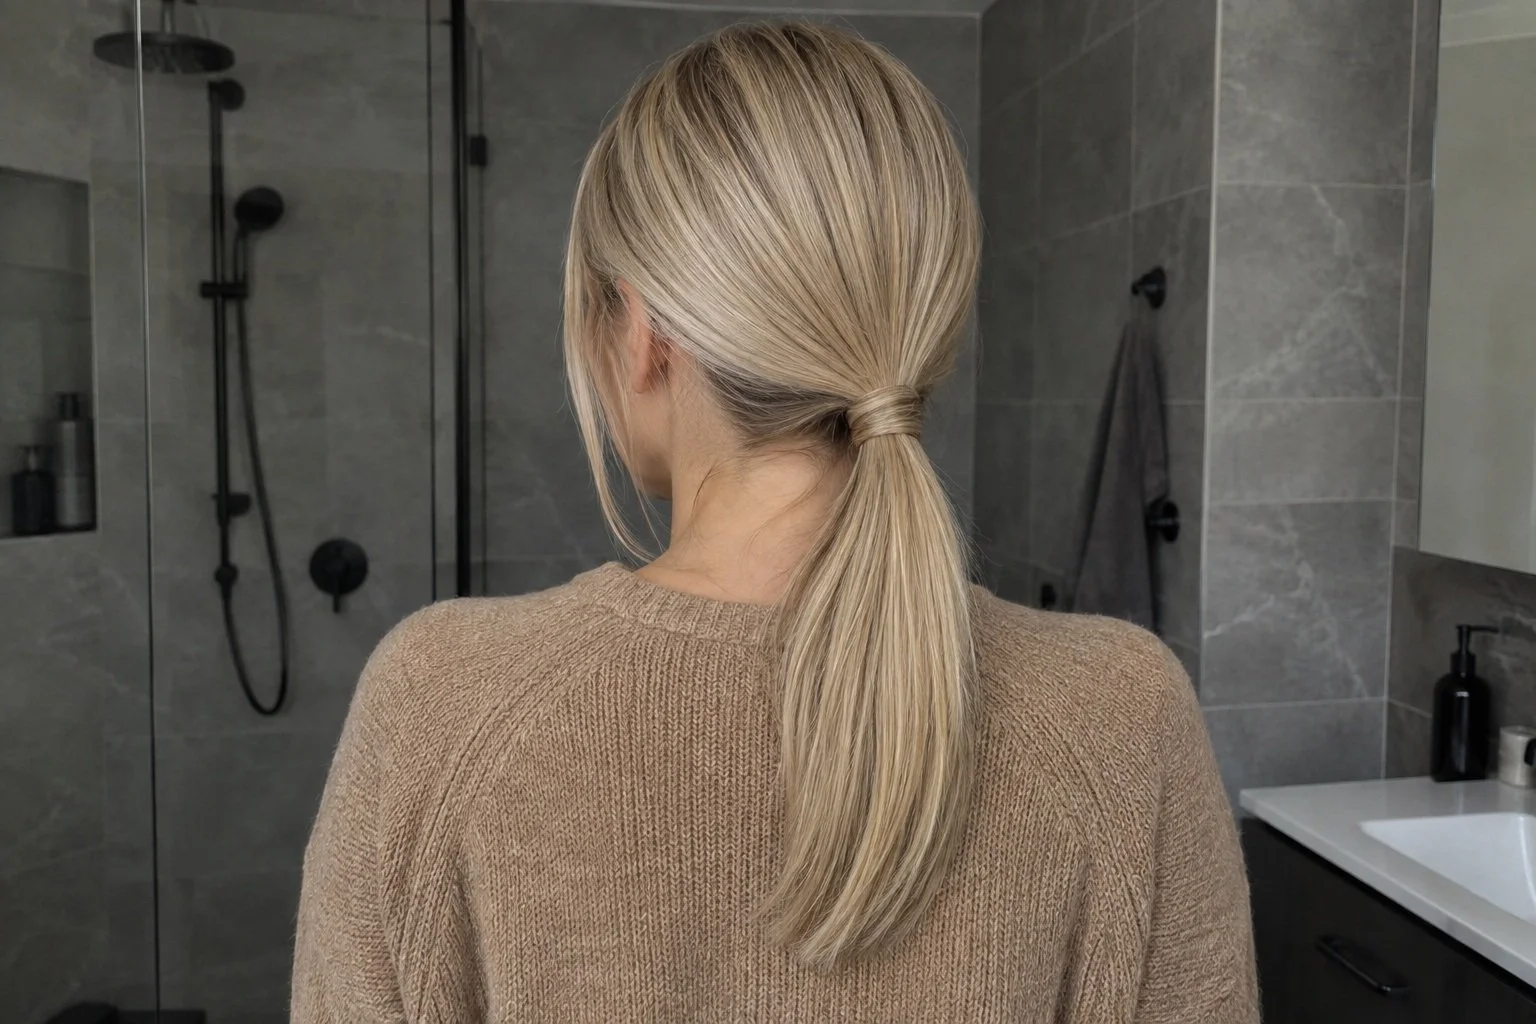
Such a small change, but hiding the hair tie makes a basic ponytail feel a lot more finished. I’d wear this with a blazer, a dress, or literally the same jeans as yesterday.
Works best for: Medium to long hair.
You'll need: Hair elastic; one or two bobby pins.
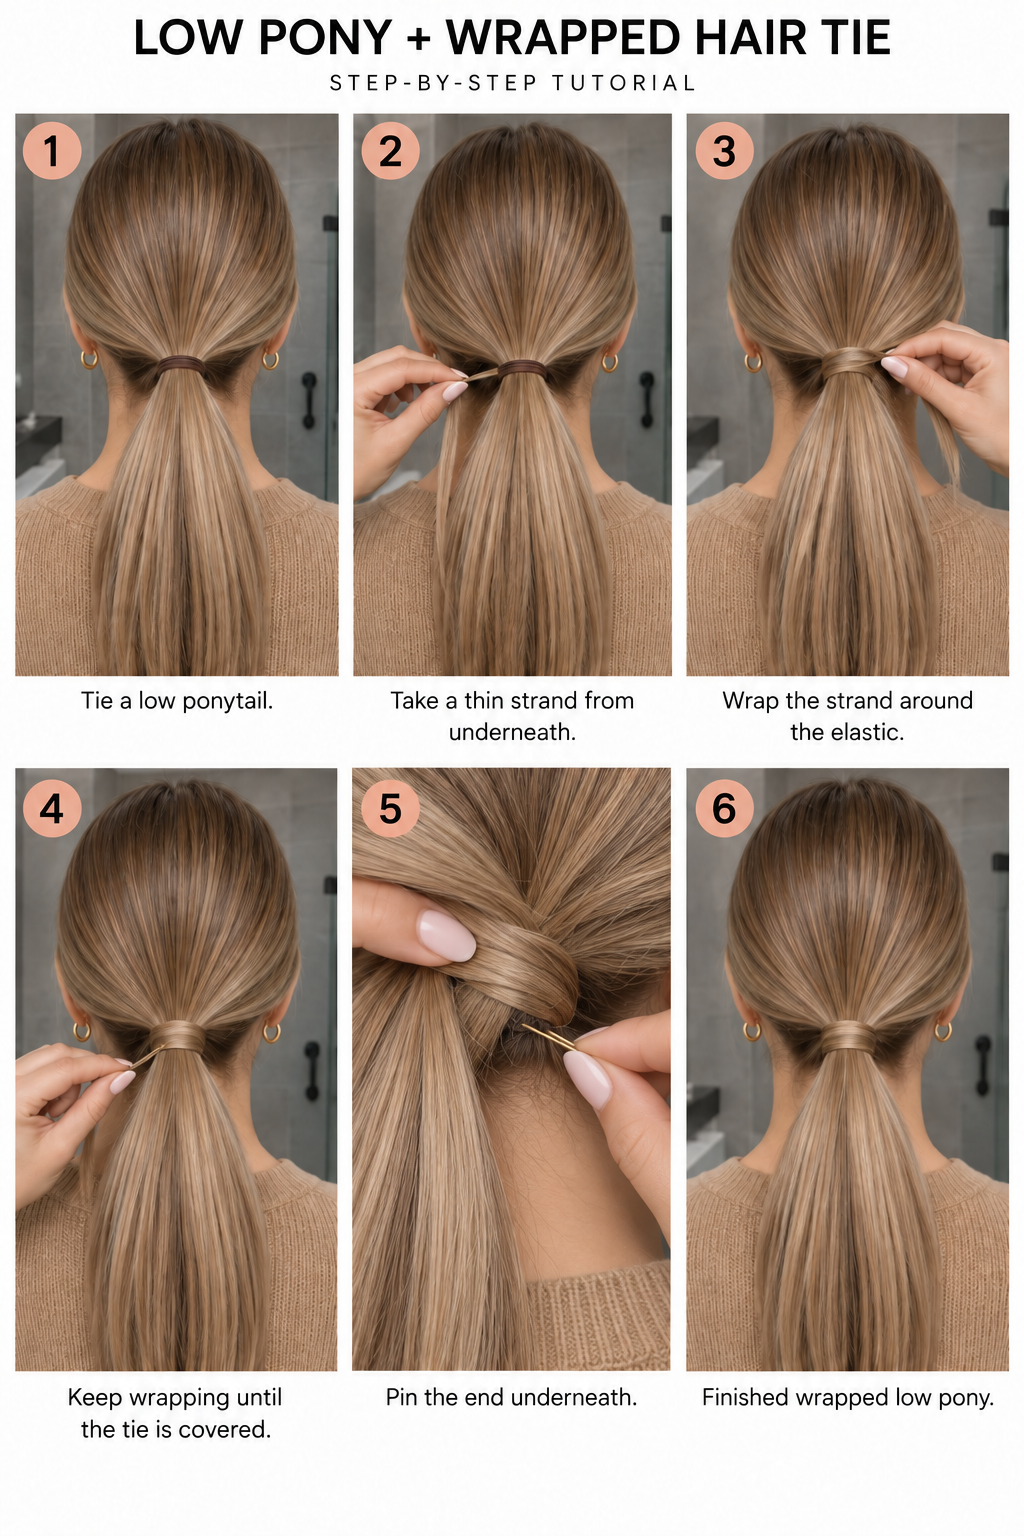
Tie a low ponytail at the nape.
Take a narrow strand from the underside of the ponytail.
Wrap that strand around the elastic until the tie is covered.
Pin the end underneath the ponytail, sliding the pin toward the base so it catches the wrap and some anchored hair.
Leave enough of the strand’s end to pin securely. If it keeps slipping, use a second pin crossed over the first underneath.
11. Voluminous Half-Up Pony
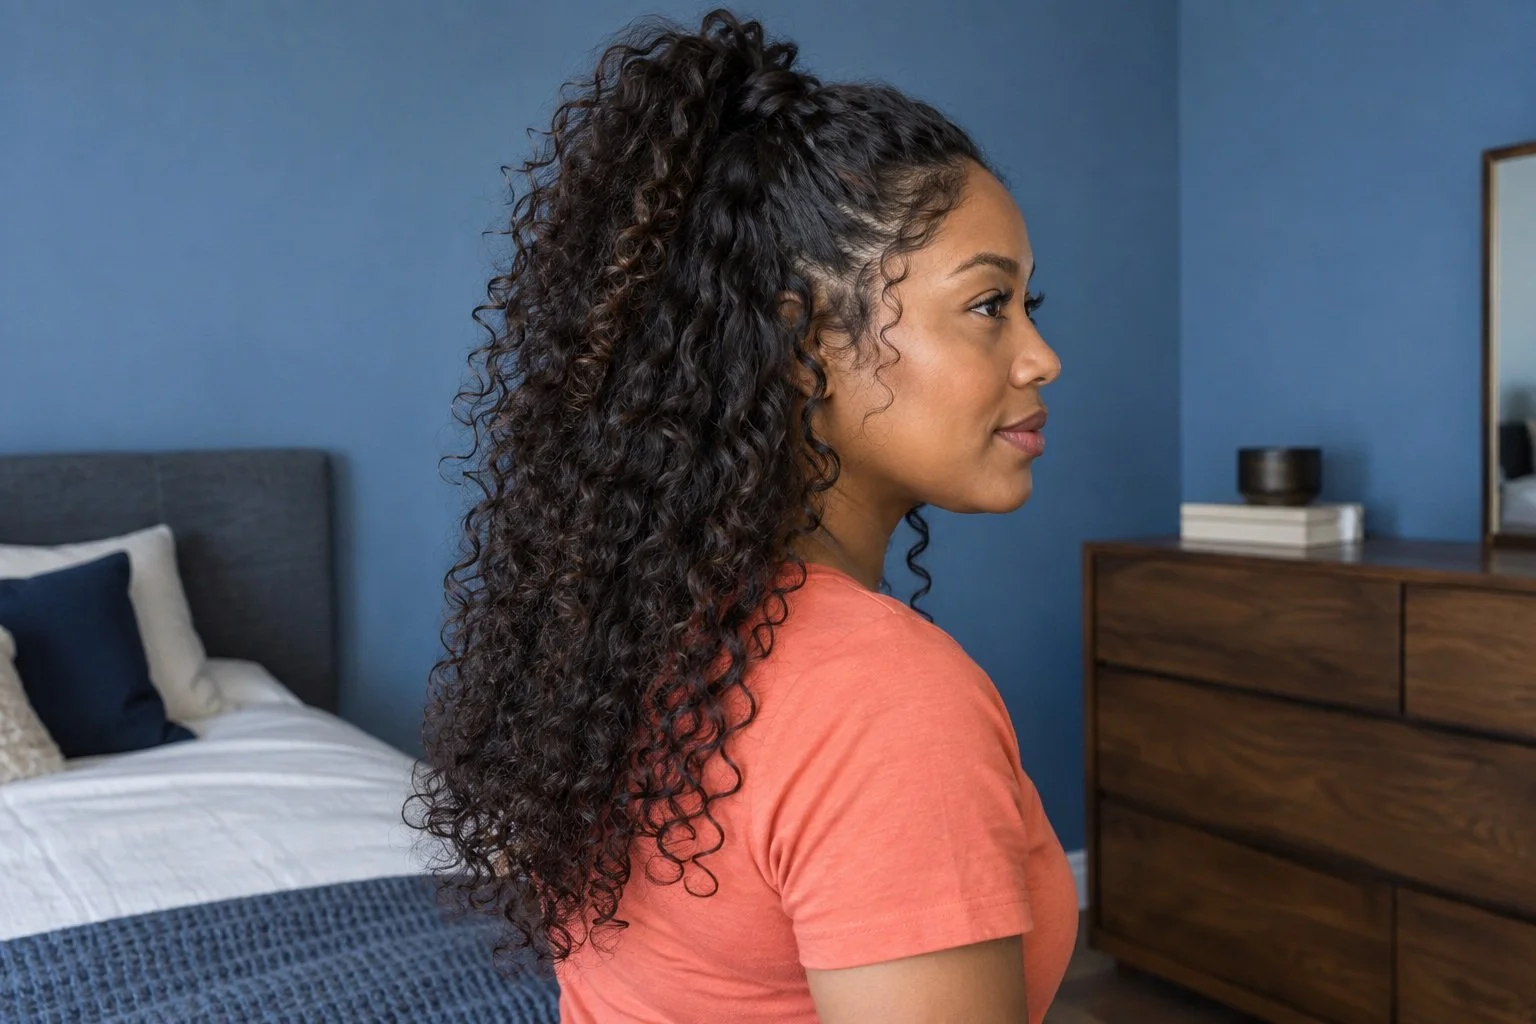
You still get to wear your hair down, but with a little height at the top. I especially like this on curls because the ponytail already has so much shape.
Works best for: Medium to long hair.
You'll need: Small elastic; optional mini claw clip.
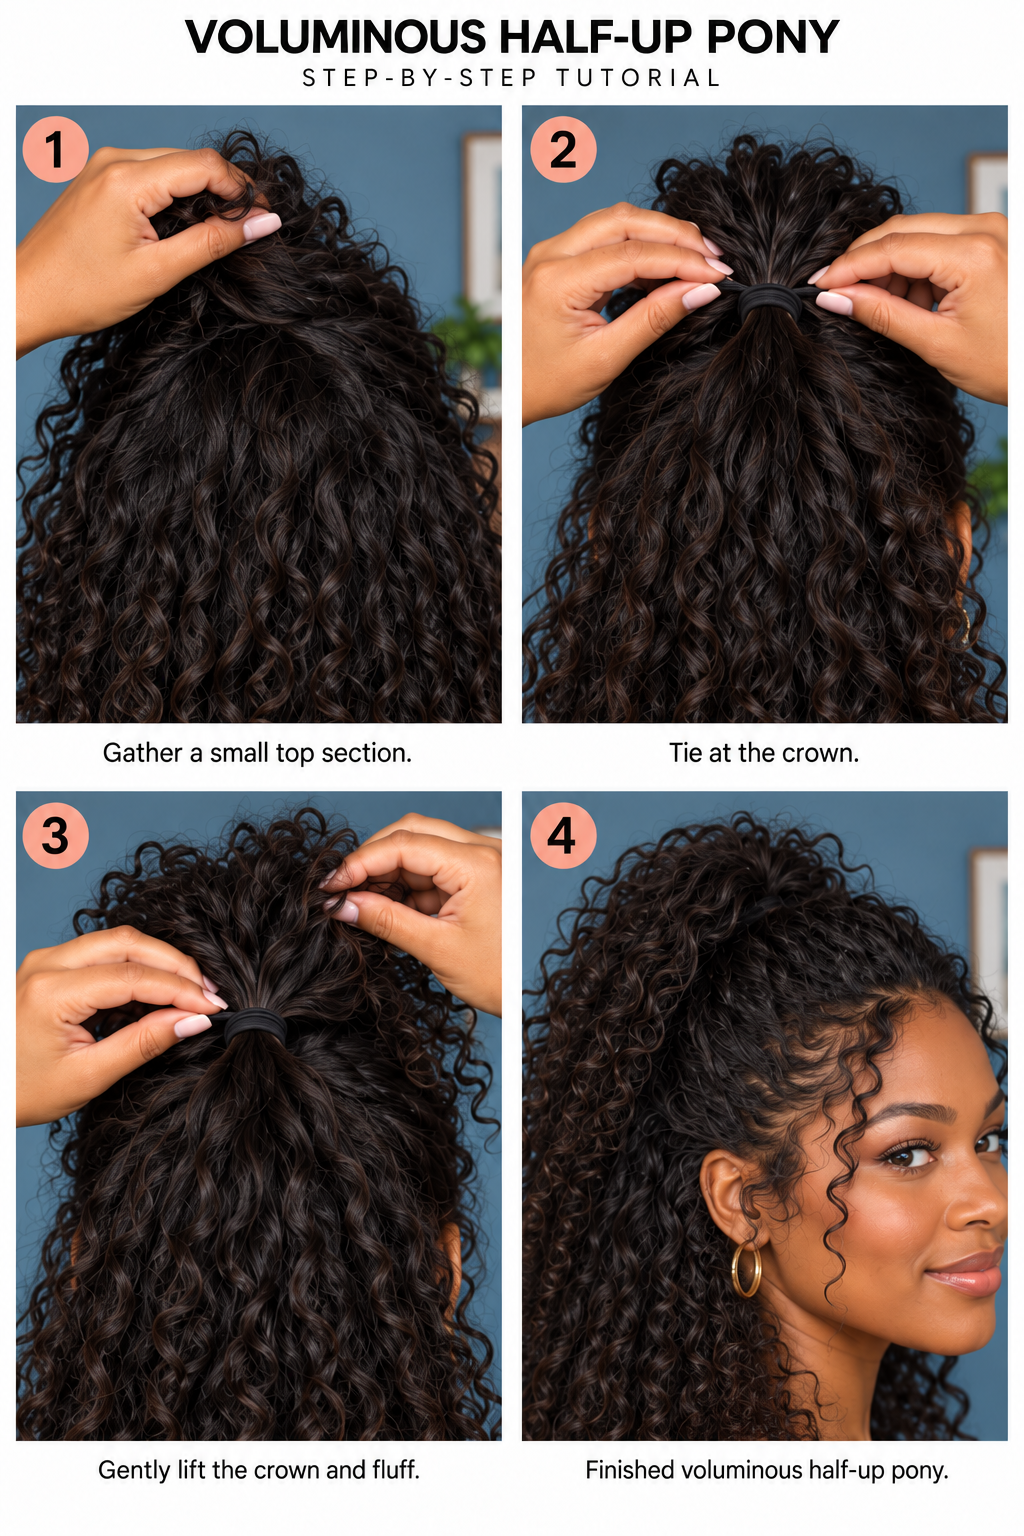
Gather the upper section from your temples toward the crown, leaving the lower hair loose.
Secure that section with a small elastic at the crown.
Hold the elastic steady and gently ease a few small sections at the crown upward.
Fluff the half-ponytail with your fingers. For extra lift, add a tiny claw under its base and cover it with the tail.
Keep the gathered section fairly small. Taking too much hair from underneath can make the loose part look thin.
12. Half-Up Messy Bun
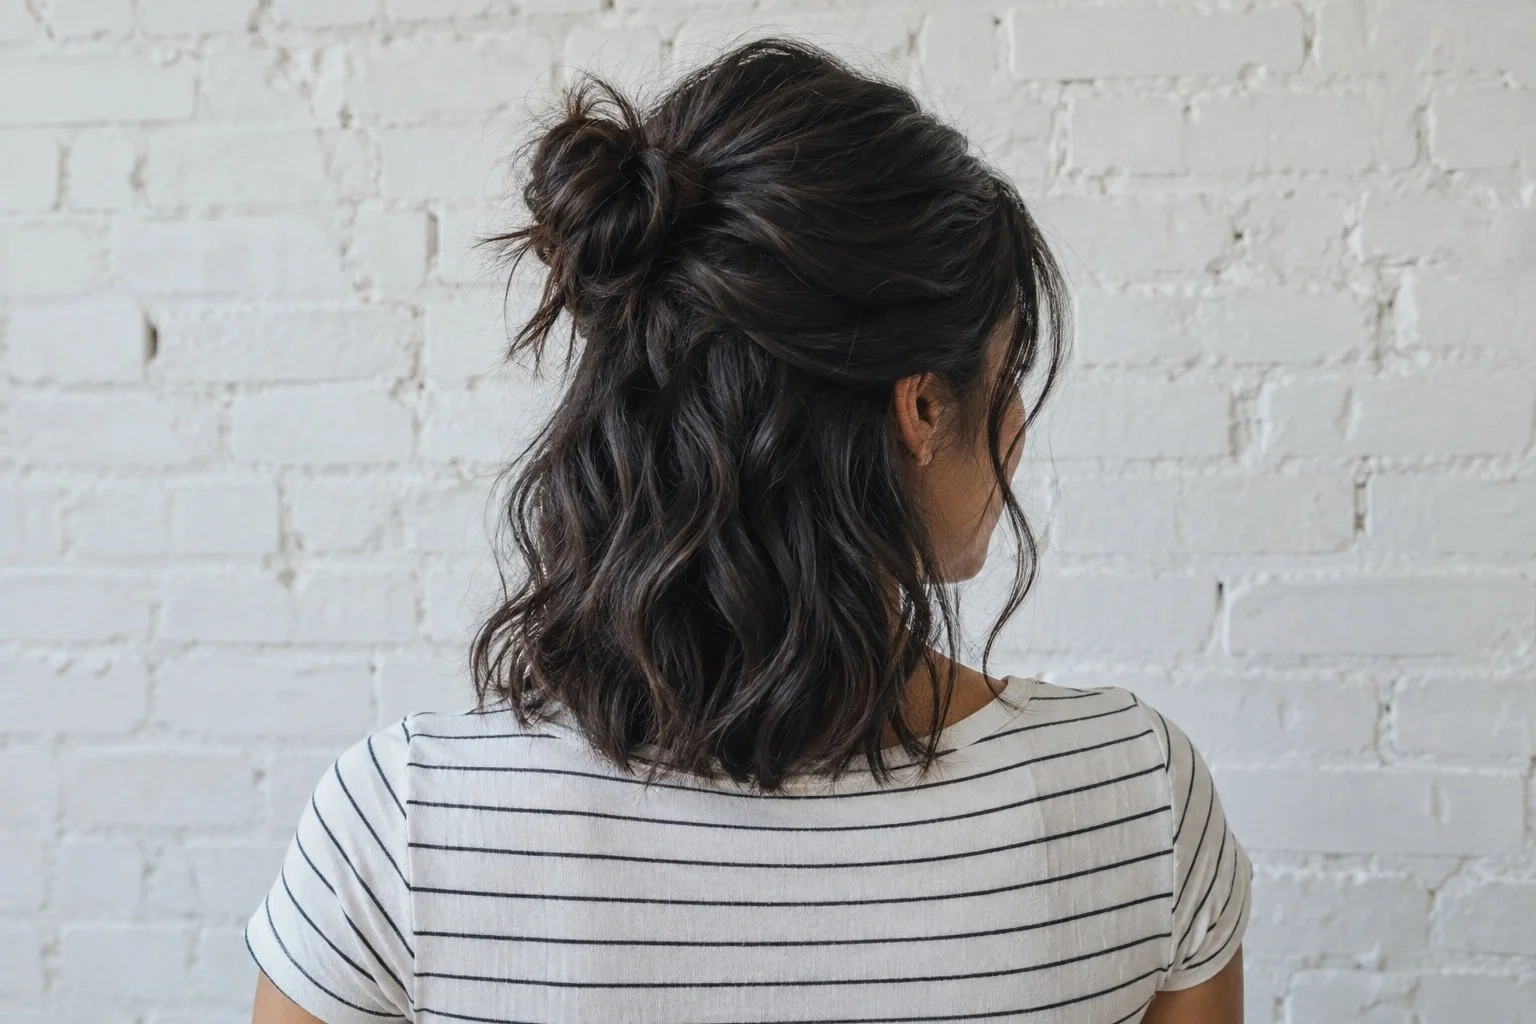
This is a good one when the top of your hair has given up but the lengths still look cute. You only have to deal with half your head. Love that.
Works best for: Medium to long hair.
You'll need: Small elastic; optional bobby pin.
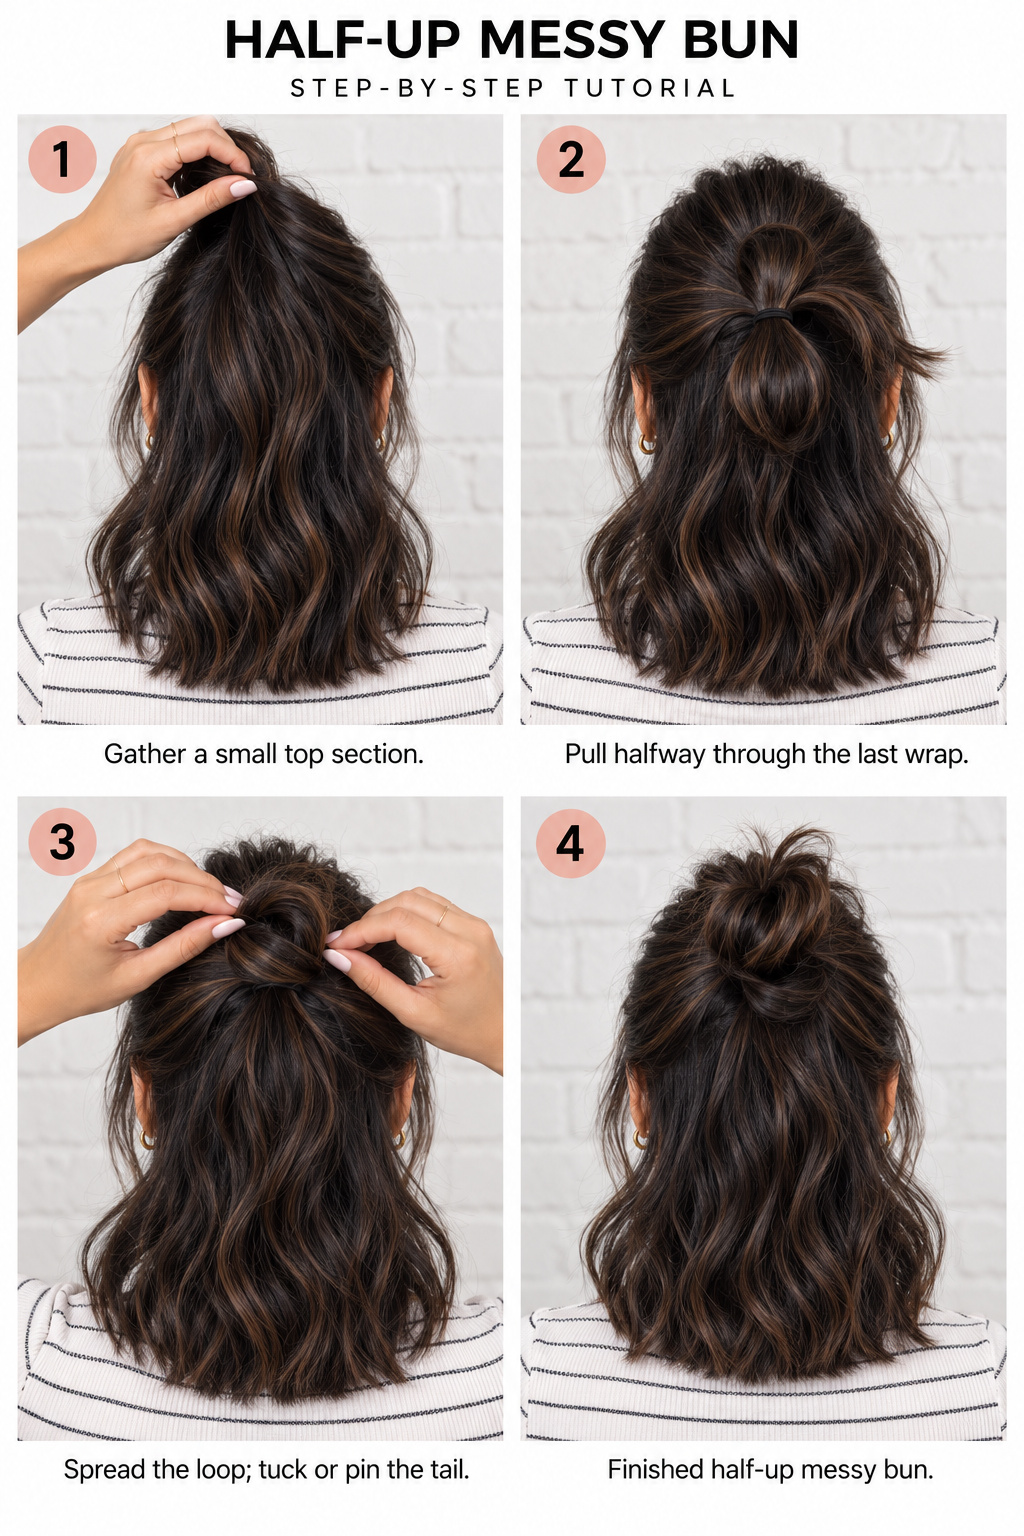
Gather a small top section from around your temples, leaving the sides and lower lengths loose.
Start tying it into a high half-ponytail. On the final pass, stop halfway through to make a little loop.
Spread the loop, then tuck or pin the short loose tail around its base.
On medium hair, leave the tiny ends out rather than trying to wrap them all the way around. That’s part of the messy-bun look.
13. Wide Headband + Hair Down
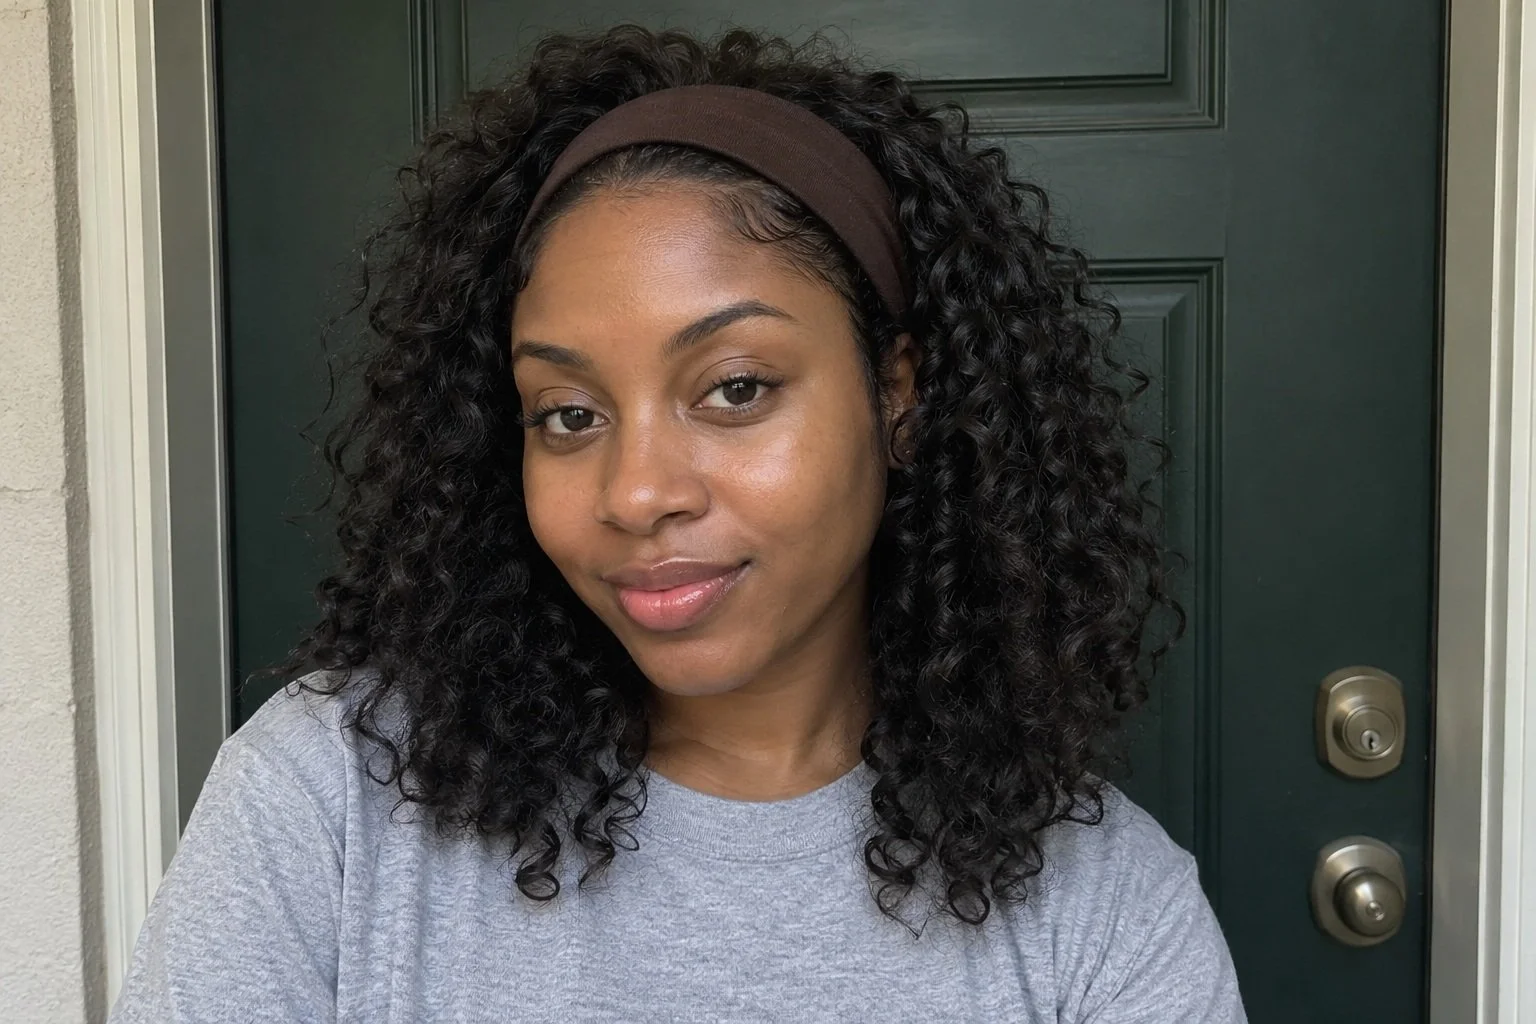
Possibly the easiest hairstyle on the list. I like a wide headband with an oversized tee or sweatshirt when I want the outfit to feel styled without doing a whole hair routine.
Works best for: Short, medium or long hair.
You'll need: Wide stretchy headband.
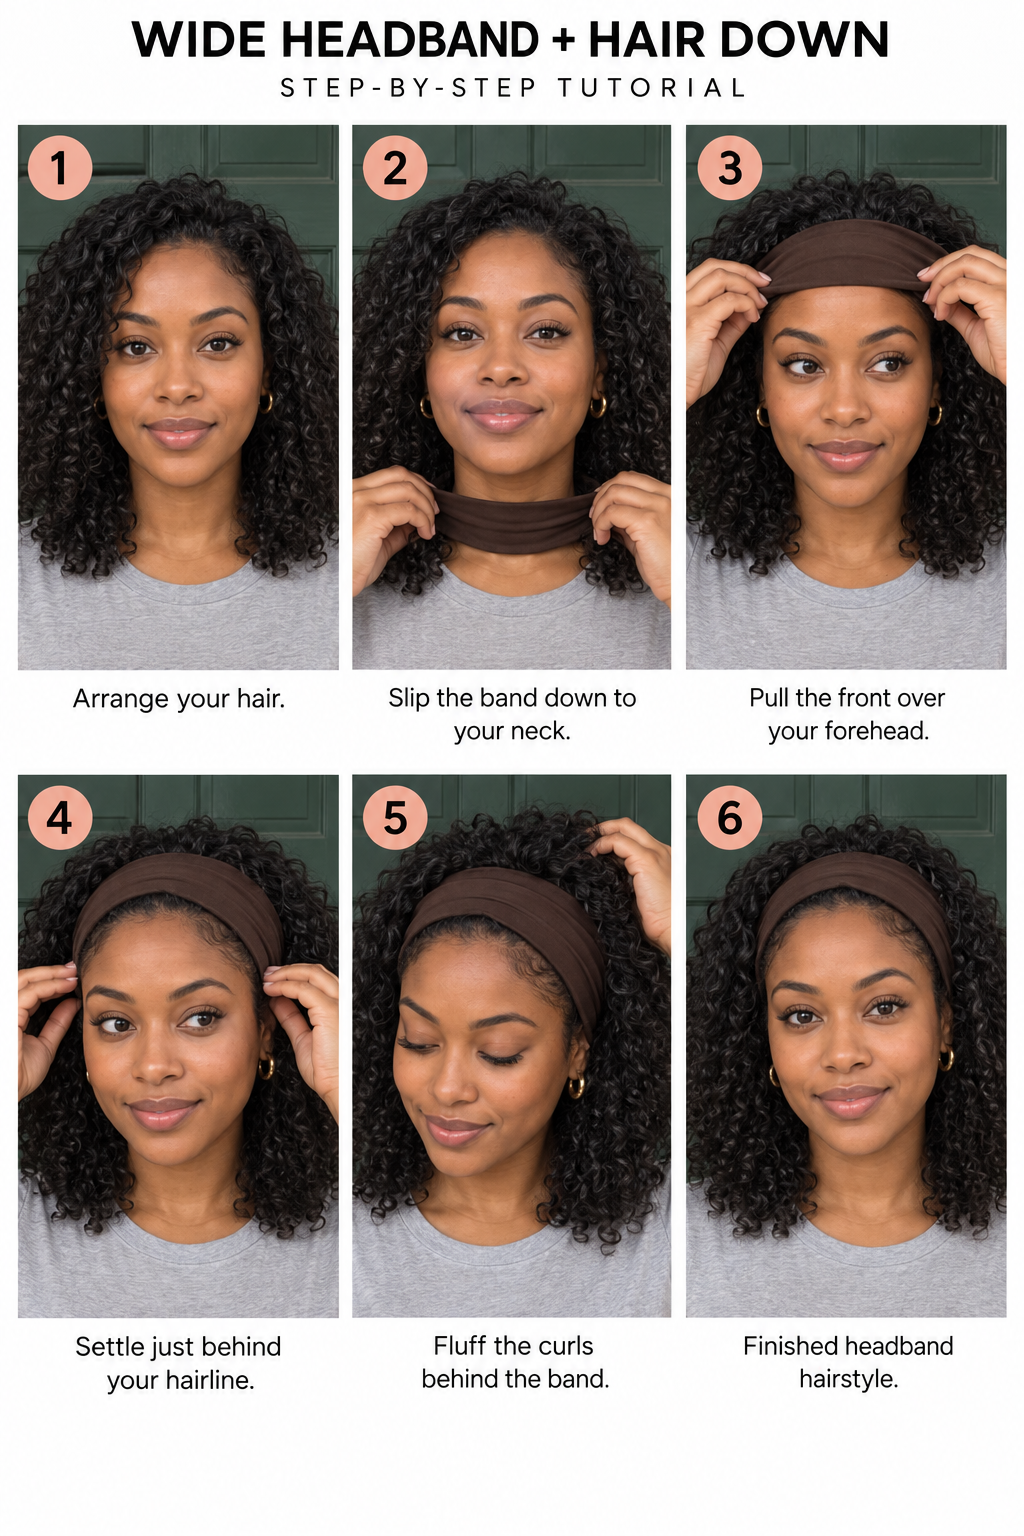
Arrange your hair in the part or shape you want to keep.
Stretch a fabric headband over your head and down around your neck, freeing your hair from underneath.
Pull the front of the band up over your forehead and settle it just behind your hairline.
Adjust the sides around your ears, then lift or fluff the loose hair behind the band.
Pick a band that stays put without squeezing. For curls, use your fingers to arrange them instead of brushing them flat.
14. Two Tiny Face-Framing Braids
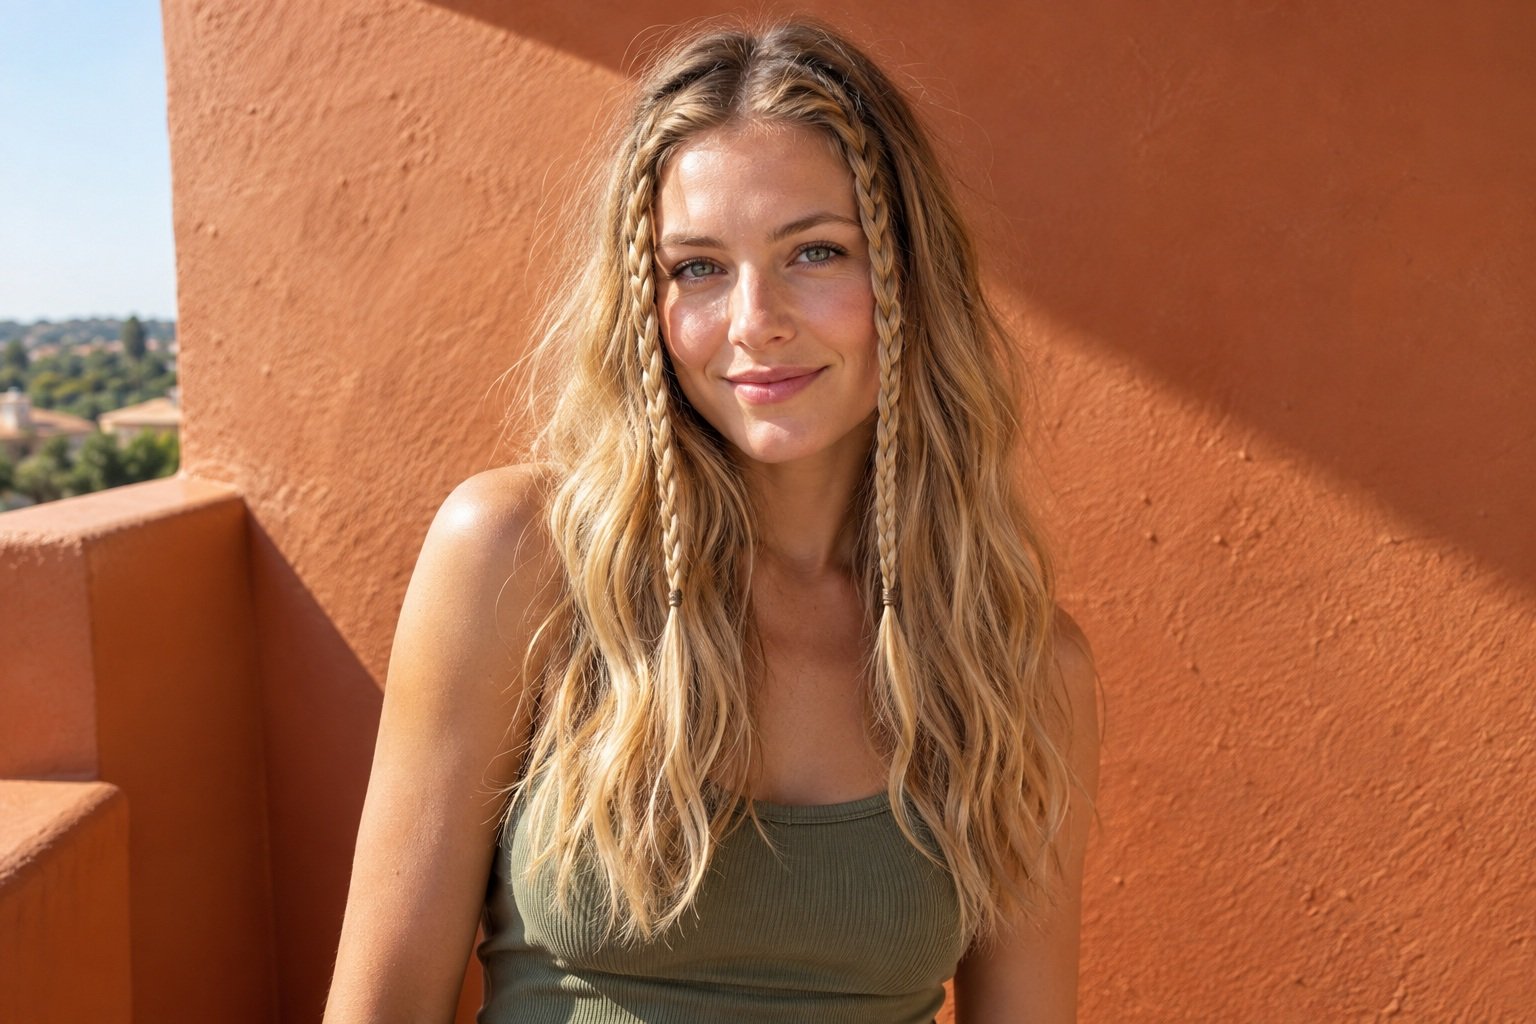
These add a little something when I want my hair down but don’t want it to look exactly the same as always. No French braiding. No taking sections from the back of your head.
Works best for: Medium to long hair; front pieces need enough length.
You'll need: Two tiny elastics.
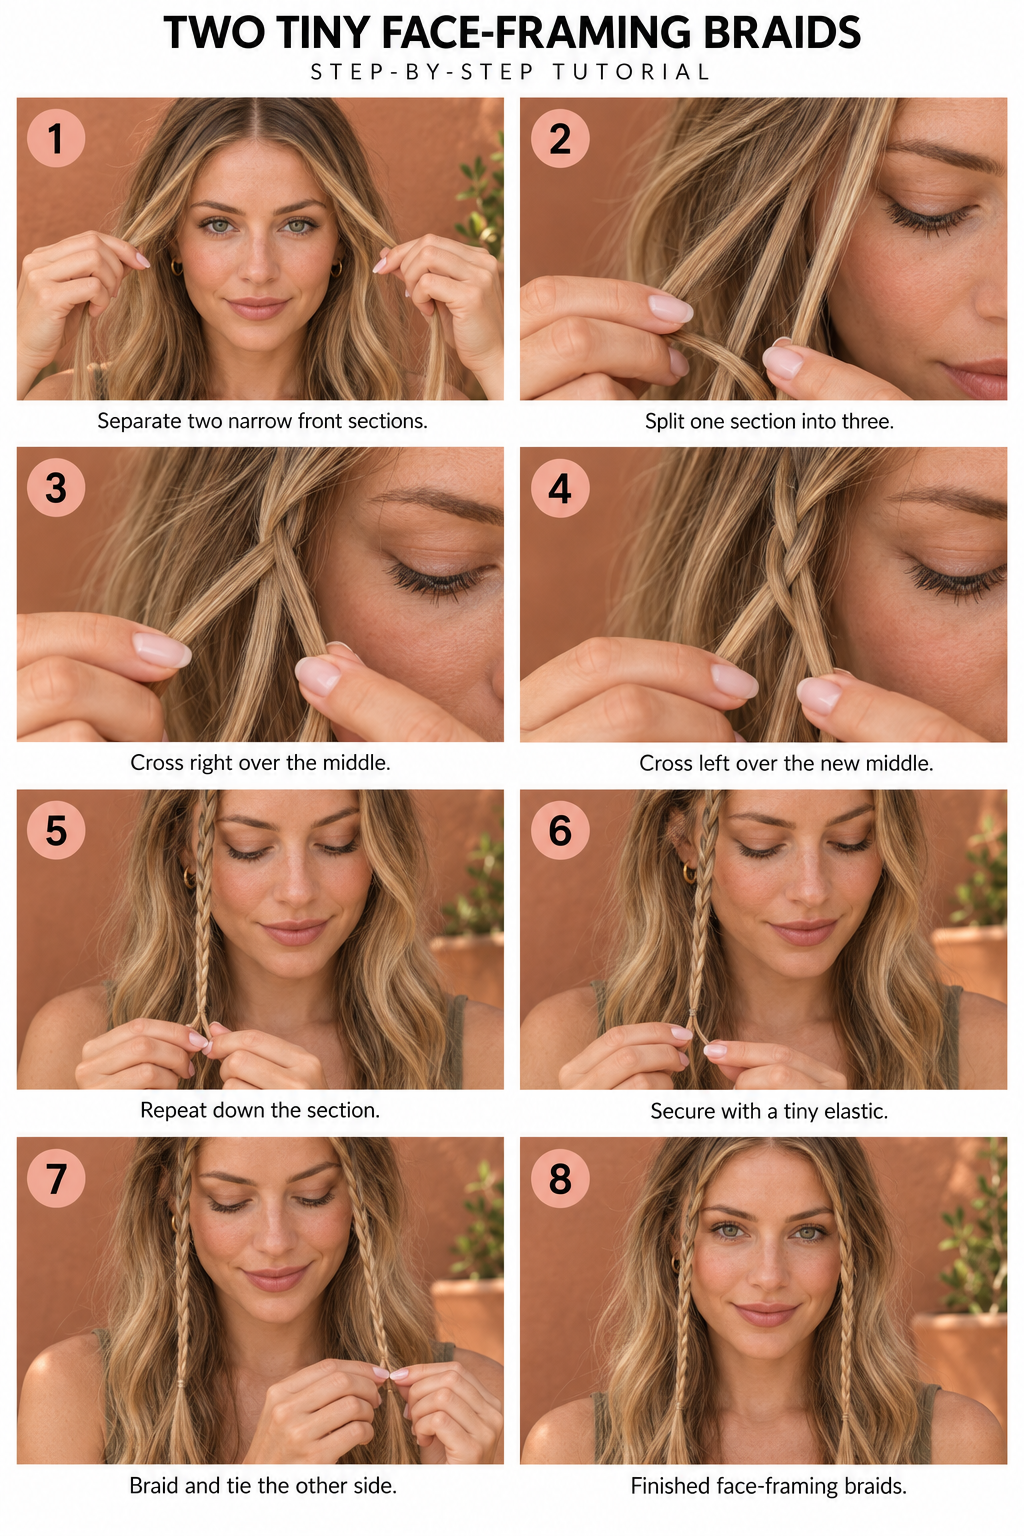
Part your hair, then separate a narrow front section on each side.
Split the first section into three tiny strands. Cross the right over the middle, then the left over the new middle, repeating down the section.
Secure the end with a tiny elastic.
Repeat on the other side, using a similar amount of hair and tying it off at roughly the same length.
Keep the sections small enough to look like accents. Braiding slightly forward makes it easier to see what your fingers are doing.
15. Twisted Half-Up Hairstyle
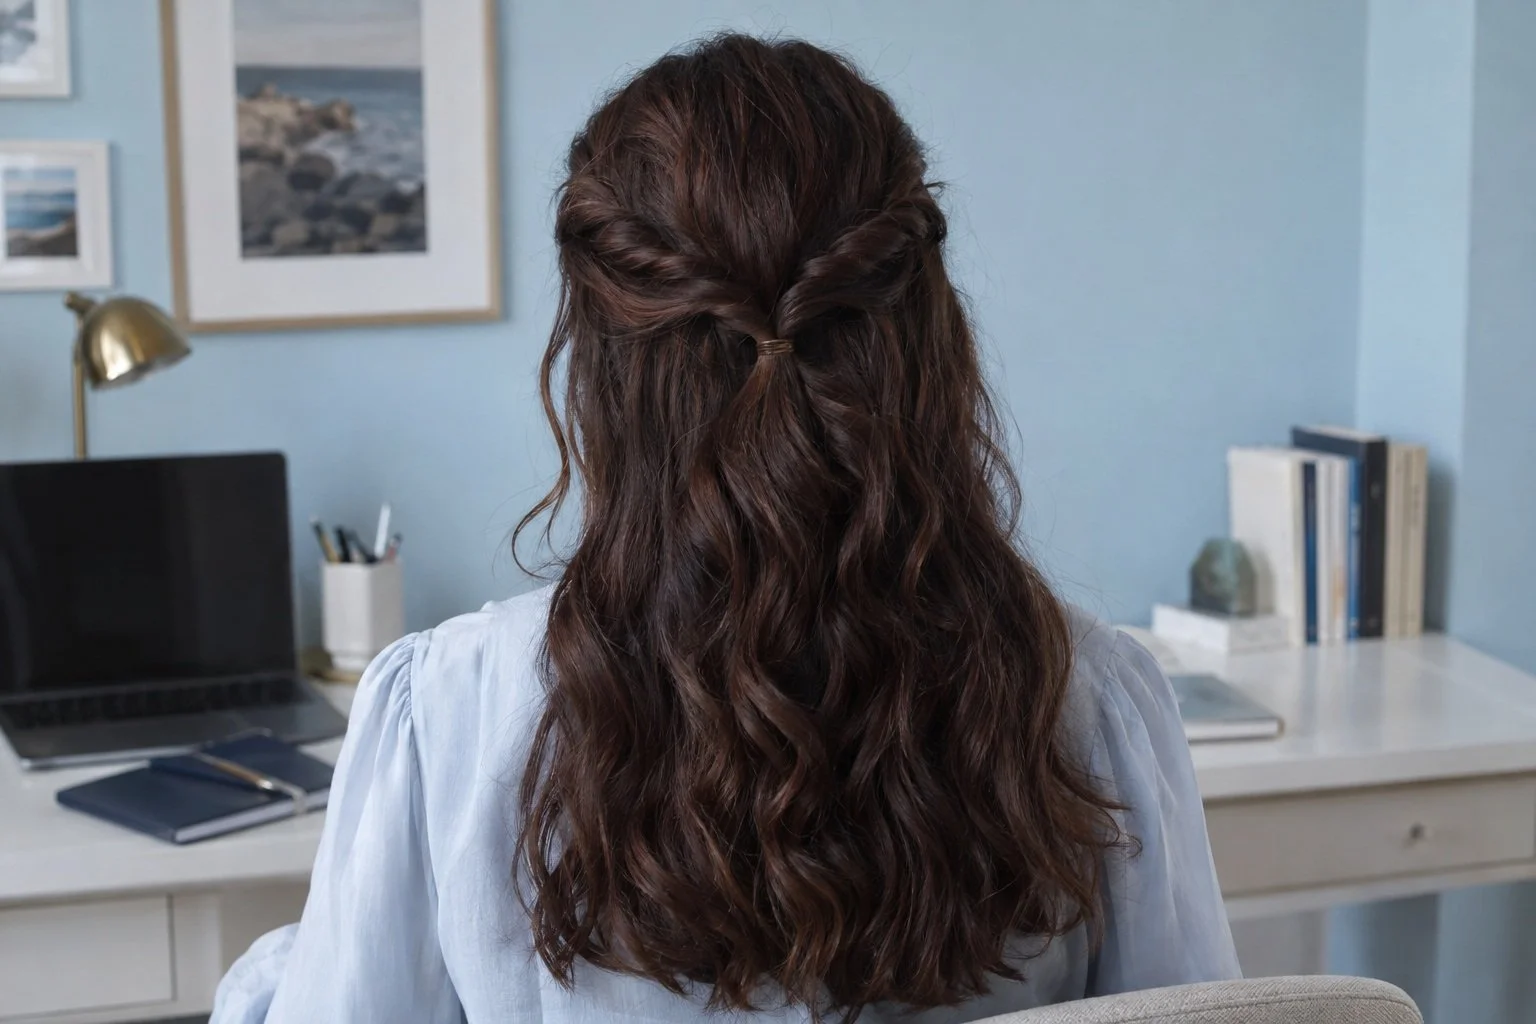
I’d pick this when I want something soft and pretty but have absolutely no intention of learning a complicated braid. Two twists and a hair tie do the job.
Works best for: Medium to long hair.
You'll need: Small elastic.
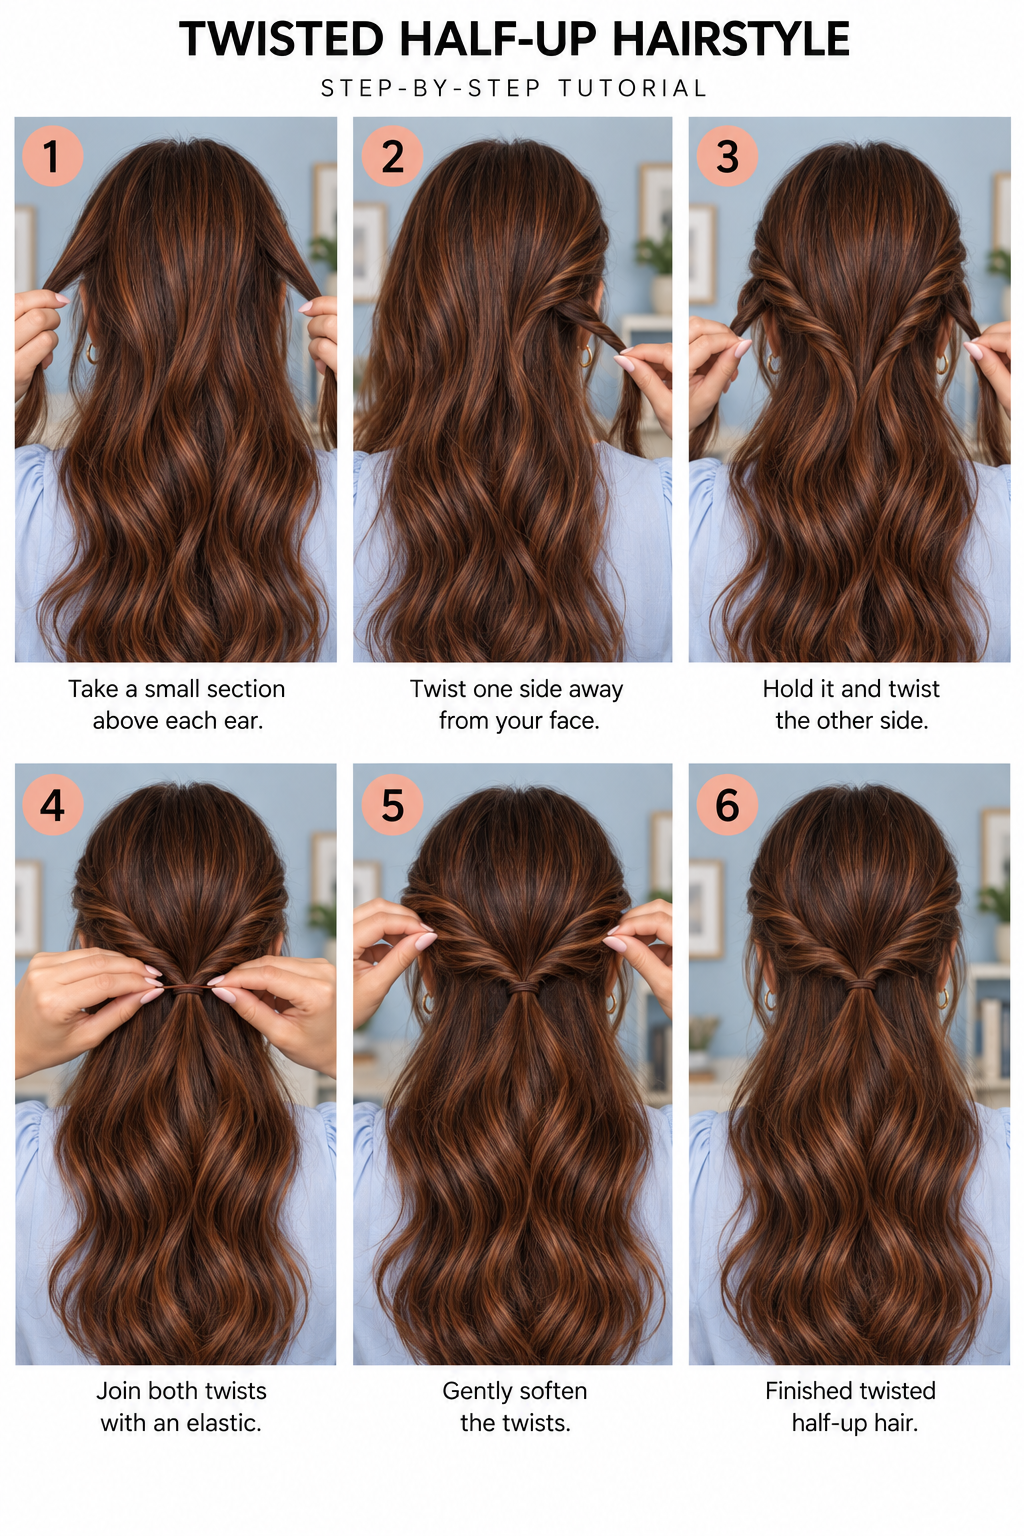
Take a small section from just above each ear, leaving the lower hair down.
Twist one section away from your face and toward the back. Hold it while you twist the other side away from your face.
Bring both twists together at the back of your head and secure them with a small elastic.
Loosen the twists slightly with your fingertips if you want them softer.
If holding both sides is fiddly, park the first twist in a temporary clip while you do the second. Remove that clip after the elastic is secure.
16. Topsy-Tail Low Pony
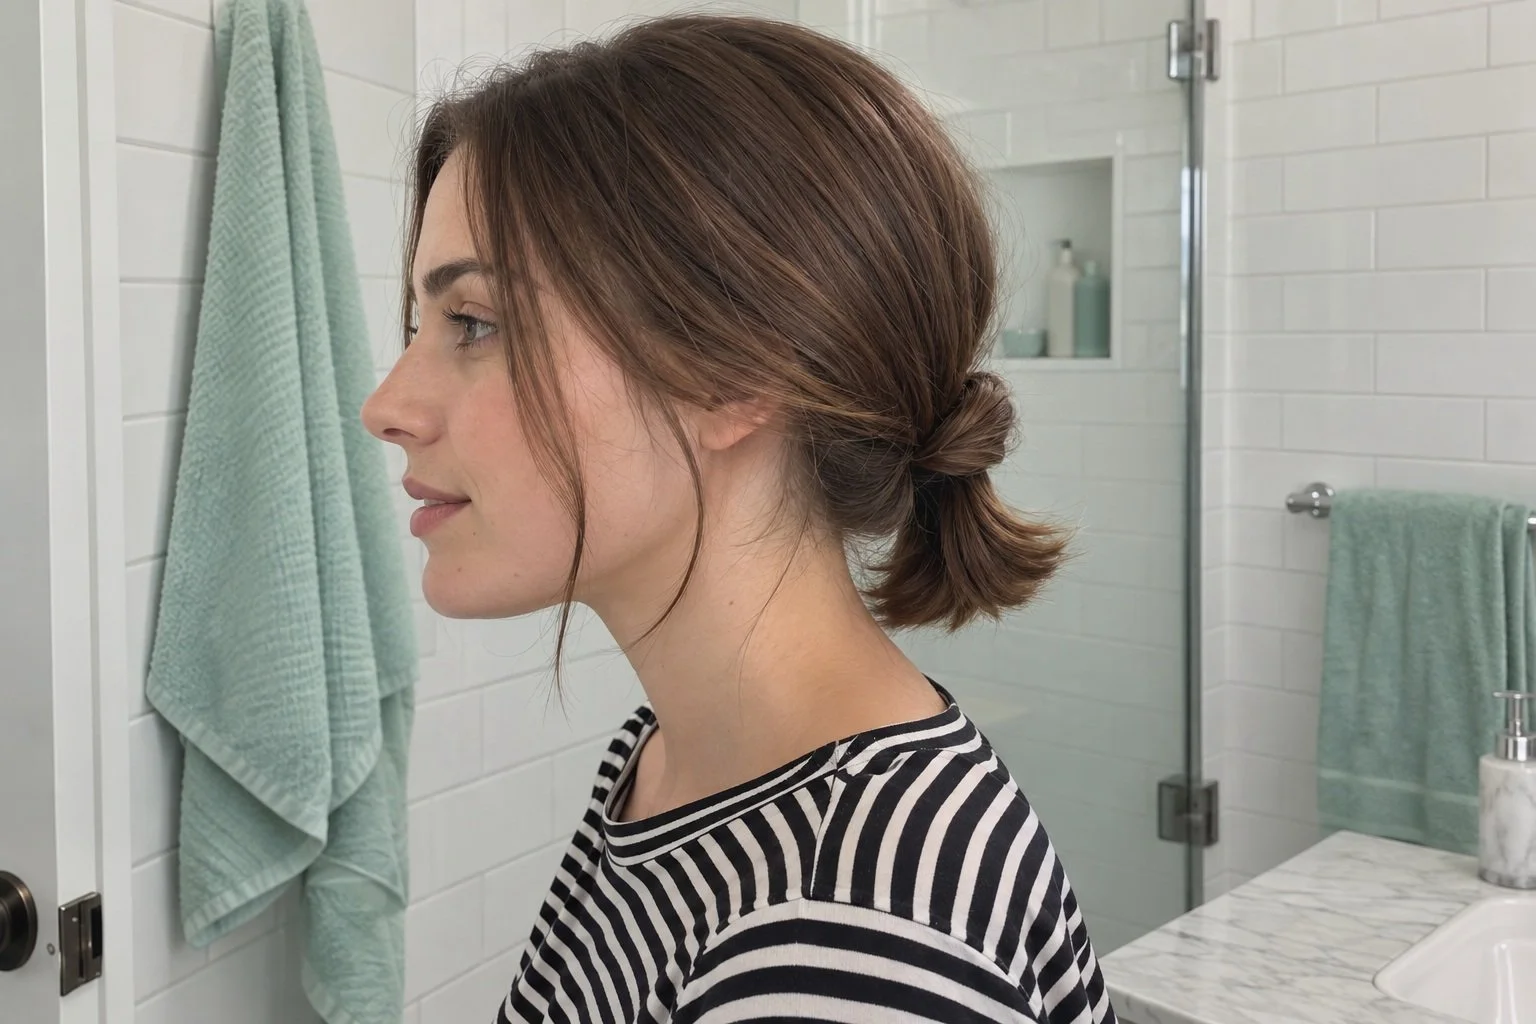
This is the low ponytail for when you want people to think you tried a little harder. The twist comes from flipping the ponytail through itself, not from any advanced hair skills.
Works best for: Medium to long hair.
You'll need: Hair elastic; optional topsy-tail tool.
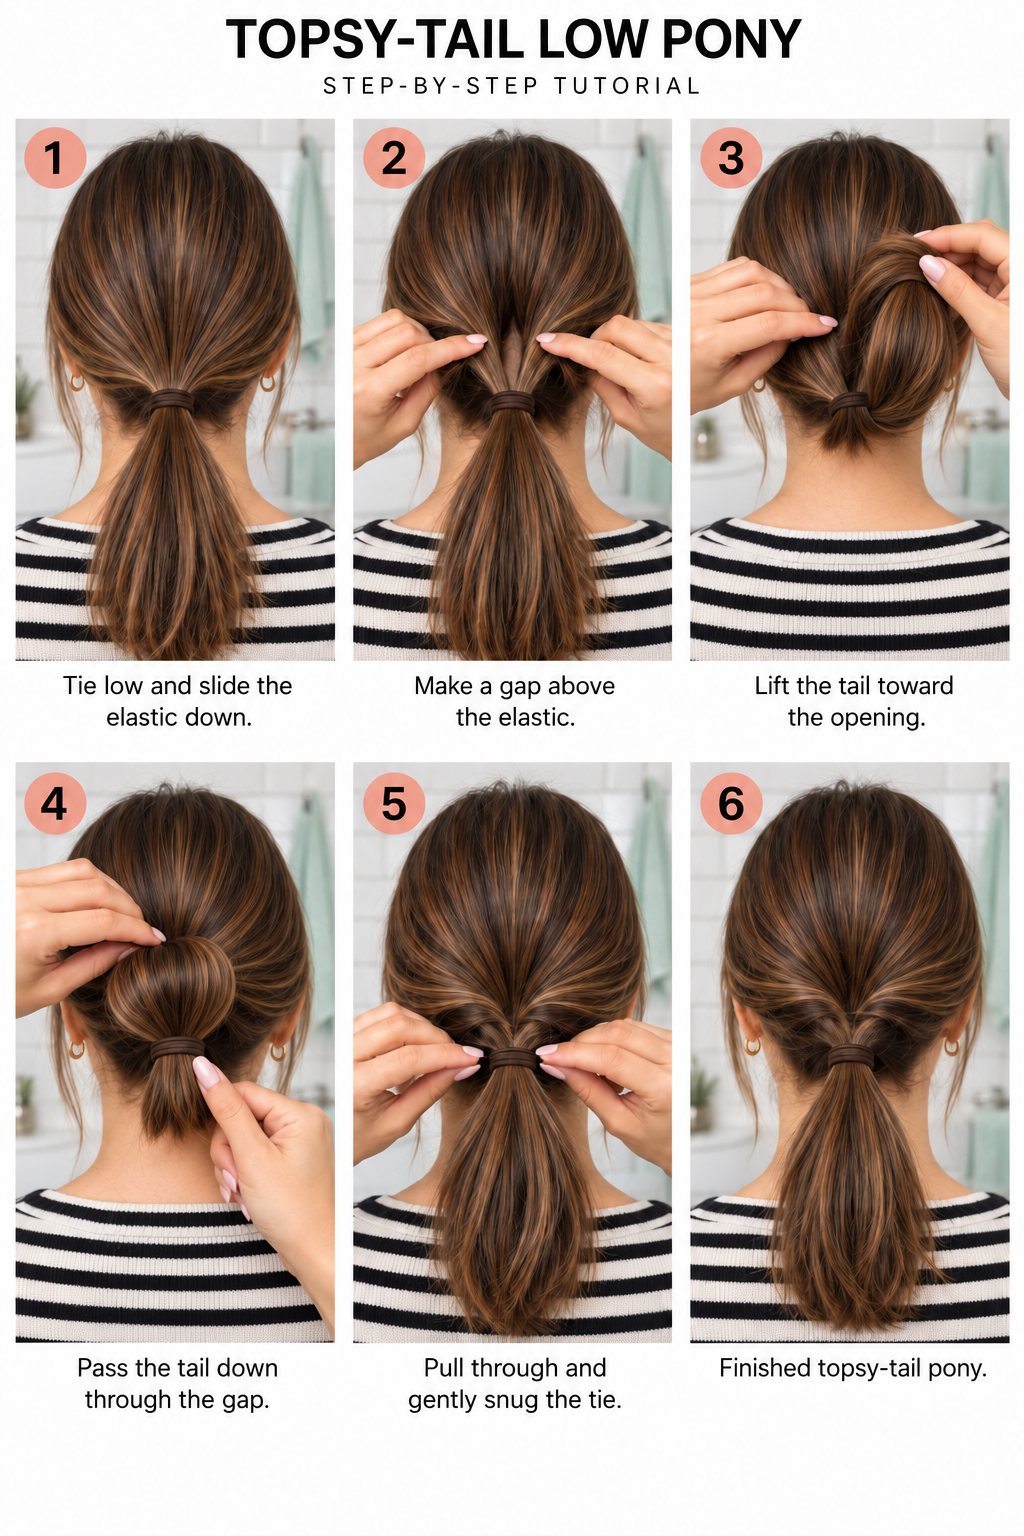
Tie a low ponytail, then slide the elastic down about an inch to create some slack.
Use two fingers to make a gap in the hair directly above the elastic.
Lift the ponytail up and pass the whole tail down through that gap, moving from the outside toward your neck.
Pull the tail all the way through, then gently snug the elastic upward and smooth the two rolled sides.
Flip it once. Repeating through the same gap can overtwist the sides and make them uncomfortable. If it catches, loosen the elastic instead of yanking.
Which Easy Hairstyle Should You Try First?
For easy hairstyles for long hair, the braided ponytail and bubble ponytail make good use of the extra length. For medium hair, smaller buns and half-up styles are usually less fiddly than trying to copy a huge updo.
The goal is to have two or three everyday hairstyles you can do without watching the same tutorial six times. Start with one, get comfortable with it, then add another. You do not need to master the entire list by tomorrow morning.
And if choosing an outfit is the other half of your getting-ready struggle, these easy outfit formulas will help with that part, too.
Save your favorites so you have something to pull up the next time your hair is doing absolutely nothing for you.